
Opord
Date:
12 SEP 26
Time:
0530
Weather:
Clear
Situation:
Following the establishment of 17th Ranger Battalion operations in Lythium, S2 has begun identifying individuals involved in the movement of weapons and supplies to armed groups throughout the region.
Recent HUMINT and surveillance have identified Mohammad “Musa” Ahmadi, a local weapons facilitator believed responsible for acquiring, storing, and distributing weapons and ammunition to armed elements operating in the area.
Musa has recently been observed operating from a compound near Kunara. Armed personnel have been observed around the location, and intelligence indicates the compound may also serve as a temporary weapons storage and distribution point.
Musa's connections beyond the local area remain unclear.
His capture and the exploitation of the compound may provide the Battalion with its first significant insight into the logistical network supporting hostile forces throughout Lythium.
Area of Operation (AO):
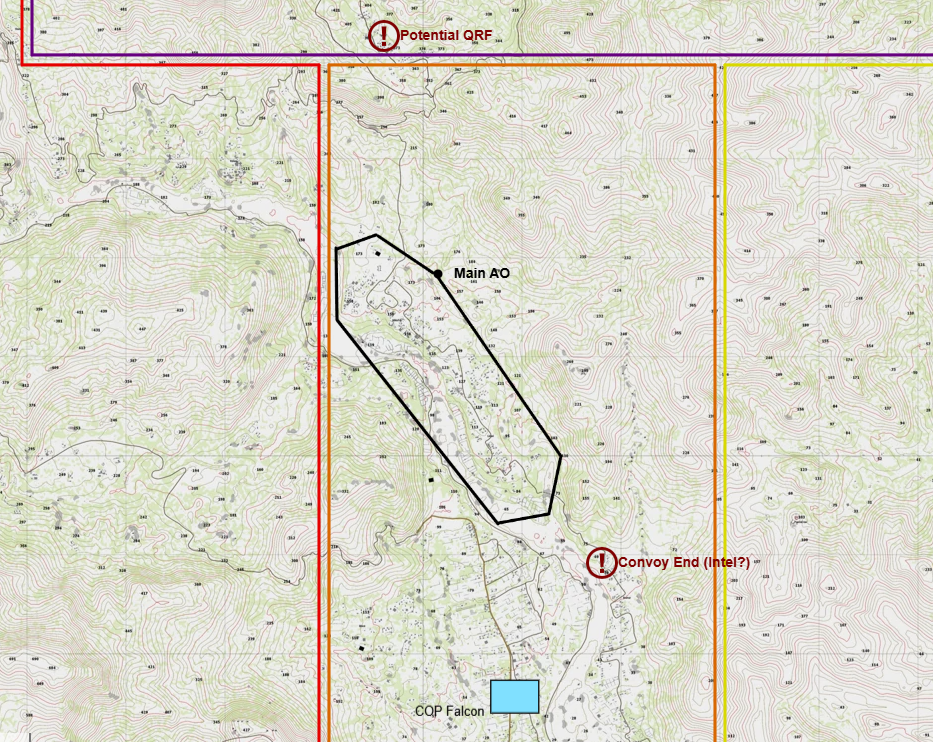
Forces in Play:
OPFOR:
- Local Militia
Most Likely Course of Action:
HVT is captured alive and intel is found throughout the AO. Any reinforcing enemies are held back.
Most Deadly Course of Action:
HVT escapes and all intel is destroyed before it can be located. Mass of enemy forces push in from the North and the mountains and overwhelm the battalion.
BLUFOR:
- 17th Ranger Battalion
Engagement Criteria:
Kunara and the surrounding area remain populated.
Positive identification of hostile personnel is required.
Limit unnecessary damage to civilian structures and maintain control of fires inside populated areas.
Mission:
Execution:
[Placeholder text]
Objectives:
- OBJ Pepperoni
- Locate and secure Mohammad “Musa” Ahmadi alive. This is his most likely location.
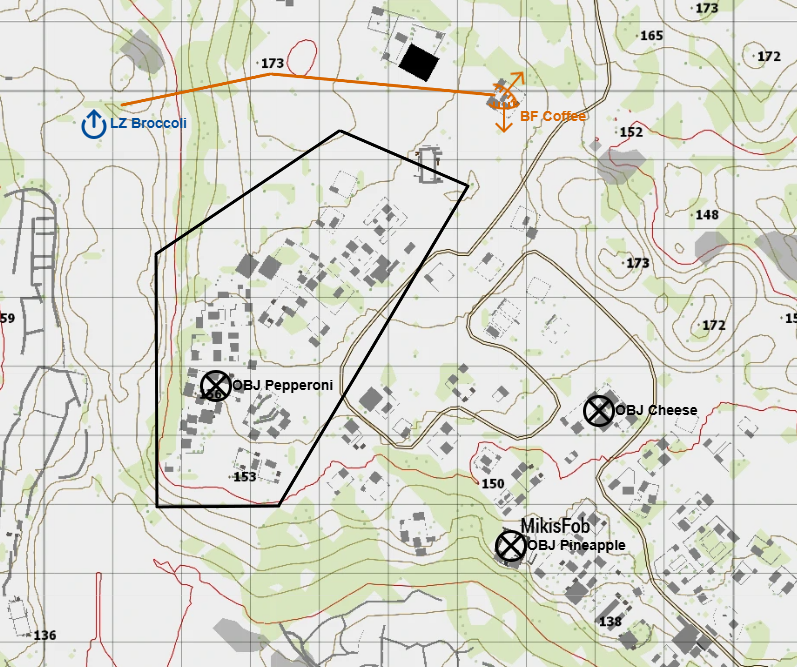
- Main infantry force will land at LZ Broccoli and quickly move in on foot to attempt to secure the HVT ALIVE.
- A blocking force (BF Coffee) should be set up at the North end of the AO to prevent any escape by car.
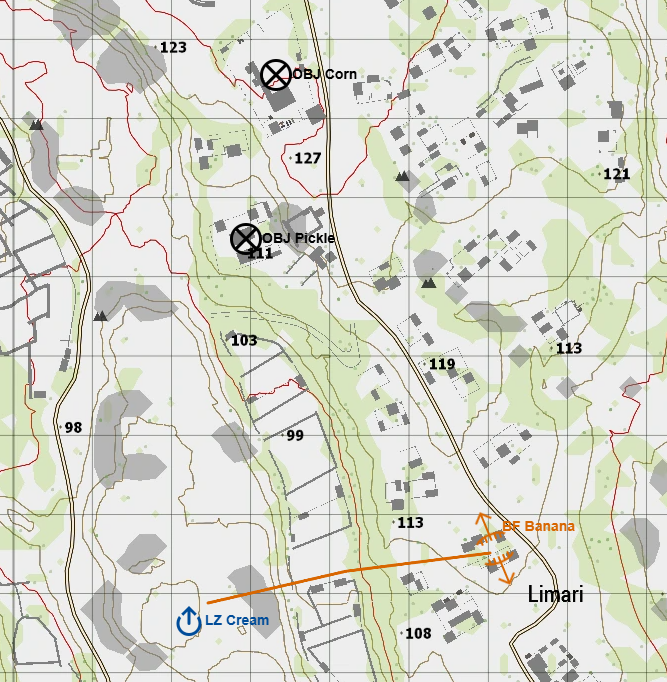
- If possible, a 2nd blocking force (BF Banana) should be set up in the far South of the AO using LZ Cream. If the HVT is secured before he can reach the Southern BF, the personnel at BF Banana should redeploy by helicopter and join the main force in the North to push together.
- Additionally, sniper teams will be deployed early to OP Omega and OP Lambda and be prepared to fire up engine blocks of any vehicles trying to leave to AO.
- Sniper firing order: Manpads -> Vehicle Engines -> Static Weapons
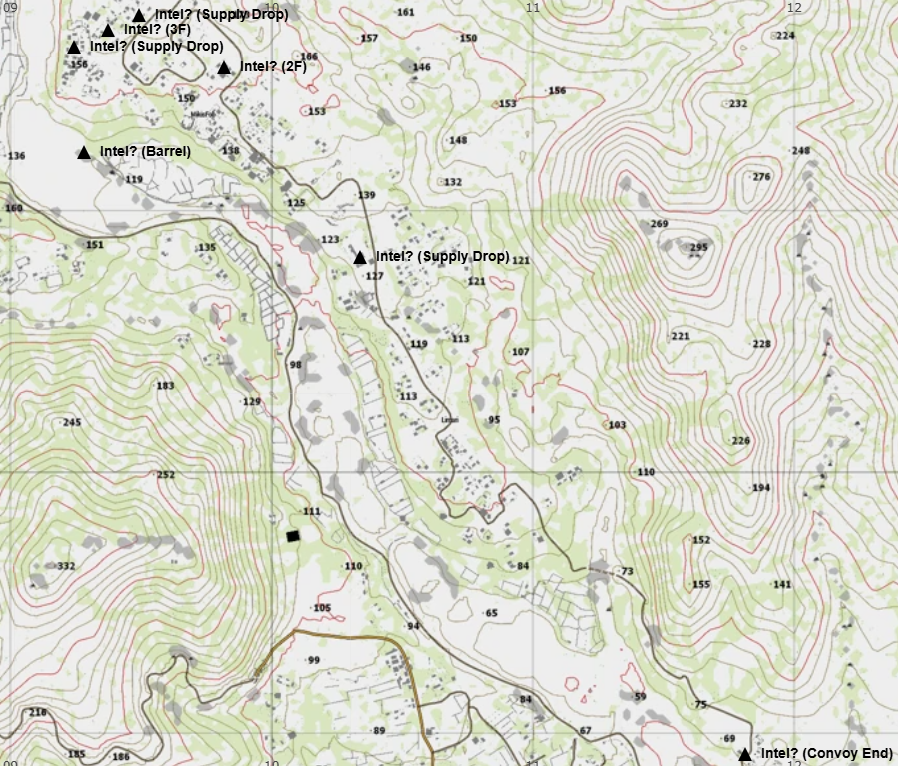
- Once the HVT is secured, he must be returned to base. Infantry will continue to hard clear the AO and search for any and all intel. Imagery provides some potential known locations of intel but there is likely to me more.
- Locate and secure Mohammad “Musa” Ahmadi alive. This is his most likely location.
- OBJ Cheese
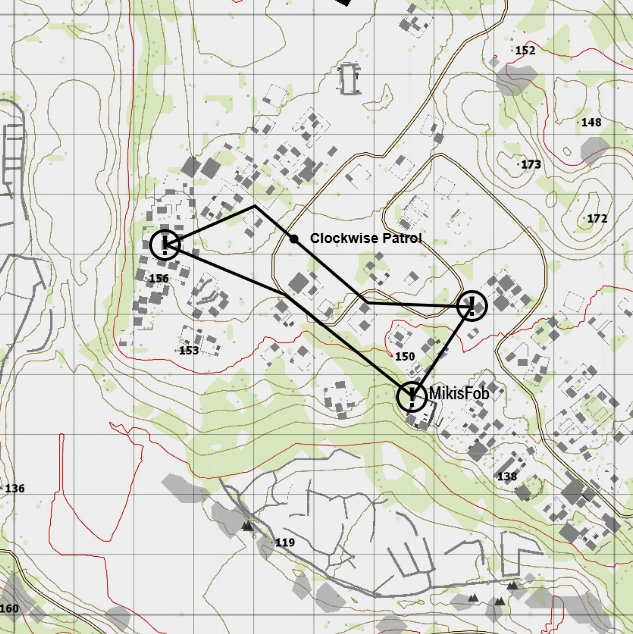
- If HVT was not in OBJ Pepperoni, then next most likely location is this heavily defended compound along his patrol route.
- Clear it, capture him alive and search for intel.
- OBJ Pineapple
- If HVT was not at either of the previous objectives, he may be here. It is a small but protected FOB.
- Clear it, capture him alive and search for intel.
- OBJ Corn
- If the HVT escapes further south he may be here. It is a well-guarded motorpool.
- Enemy vehicles may be destroyed but not at the expense of any civilian infrastrucure.
- Clear it, search for HVT is he escaped this way, capture him alive and search for intel.
- If the HVT escapes further south he may be here. It is a well-guarded motorpool.
- OBJ Pickle
- This is a nearby compound to OBJ Corn and may be another location the HVT moves to.
- Likely the forces from this compound will act as a QRF or attack BF Banana if it is utilized.
- Reminder that personnel at BF Banana are not to push enemy contact, holding BF Banana is top priority.
- Likely the forces from this compound will act as a QRF or attack BF Banana if it is utilized.
- Clear it, search for HVT is he escaped this way, capture him alive and search for intel.
- This is a nearby compound to OBJ Corn and may be another location the HVT moves to.
CONOP:
-
Phase 0:
- Sniper teams deploy to OP Omega and OP Lambda, prepare shots and await the battalion.
- Remaining undetected is critical.
- If sniper teams are compromised they are to disengage, fall back and establish new OPs in a different location.
- When battalion moves South, sniper teams must move too. Expect to be moving on foot.
- Sniper teams deploy to OP Omega and OP Lambda, prepare shots and await the battalion.
-
Phase 1: Briefing & Preparation
- Gear checks and assign vehicles.
-
Phase 2:
- Capture the HVT ALIVE and then push South and search for intel.
- Speed is key.
- Capture the HVT ALIVE and then push South and search for intel.
-
Phase 3:
- Exfil the HVT and continue to search for intel.
- Exfil the HVT and continue to search for intel.
-
Phase 4: RP/AAR
- All units prepare for debrief.
Imagery:
Main AO
(including sniper team OPs)
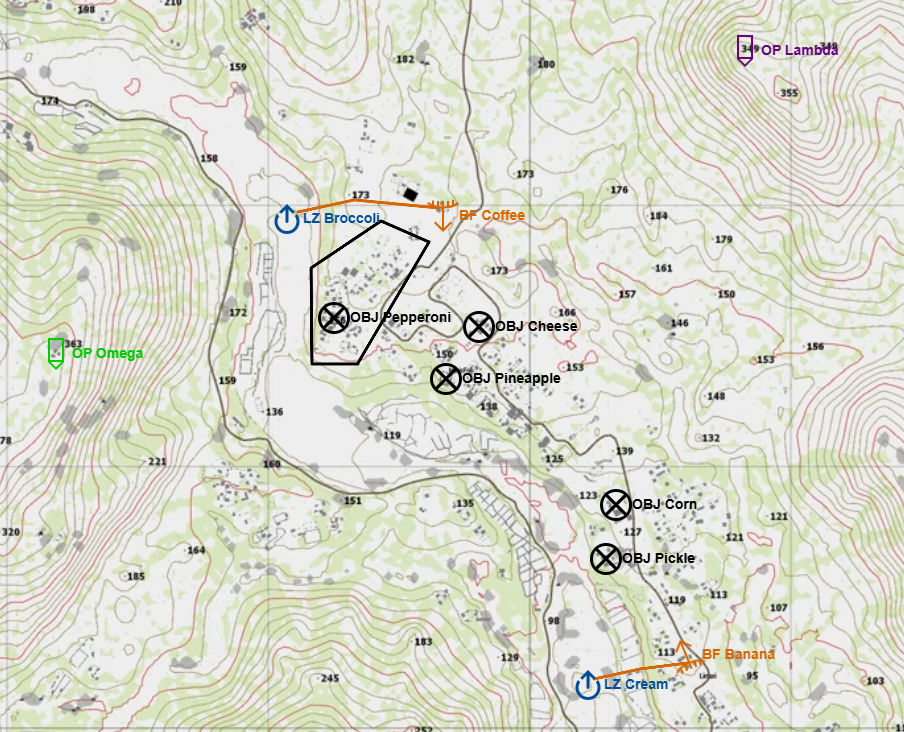
AO - North
(BF Coffee should look North & South)
AO - South
(BF Banana should look North & South)
Areas with high enemy concentration
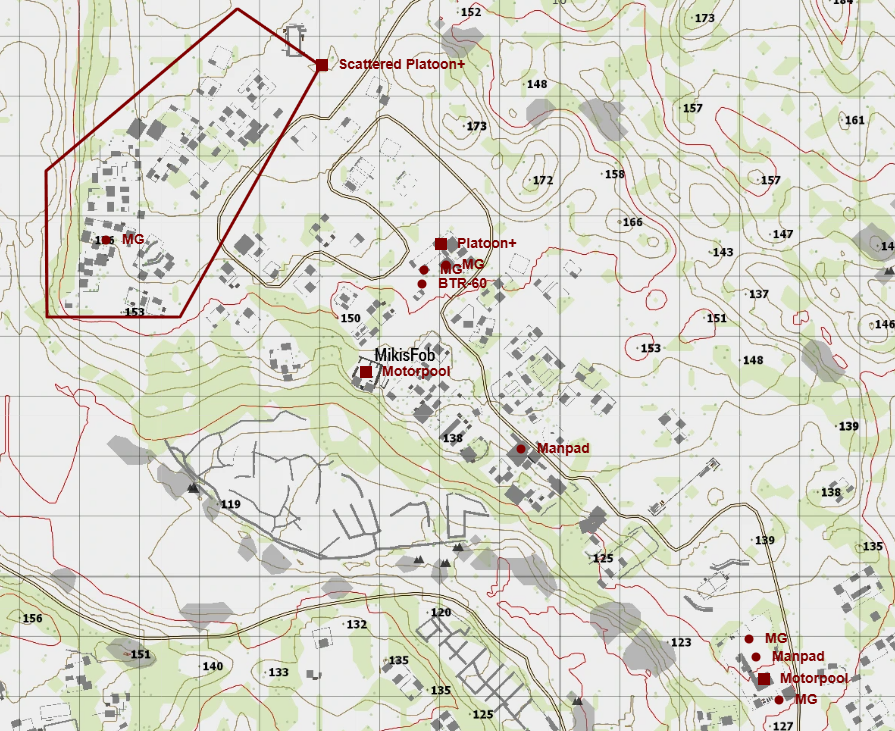
HVT patrol route
(May differ, route marked during RRC)
Potential intel locations
(Including but not limited to)
Timeline (in CST):
18:45 - Organize units and kit up.
19:00 - Operation briefing.
19:15 - Operation start.
22:30 - All OBJ cleared, prepare for AAR.
Command & Signal:
Long Range Frequencies:
- Refer to the Commo Card.
Non-verbal Communication (Smoke):
- Green: This is used to mark friendly positions on the field.
- Blue: Marking suitable locations for Landing Zones.
- Red: This is used for marking enemy positions for all units to reference.
- Yellow: This is used to inform friendly forces that Immediate medical support is needed.
- Orange: This tells anyone in the air that a friendly unit is in desperate need of resupply.
- Purple: This color represents a friendly position with enemy units danger close.
- Anyone outside of 100 meters away from the smoke should be assumed hostile.
Approved Weapons & Gear:
- Refer to the [Policy] Loadout and Weapon Restriction.
Available Assets:
Ground:
- If necessary
Naval:
- None
Air:
- MH-60's
- AH-6's