
Opord
Situation
Following our success in the City of Lingering Shadows, we secured key intel, inflicted heavy losses on enemy forces, and established a FOB west of Al Quisa. However, insurgents are now mobilizing for coordinated strikes, CSAT is reinforcing the Sons of Rayak, and ICBM convoys have been spotted moving northeast.
At the center of this escalation is Shapur Pai, a rising power filling Mosood’s void. His strategic moves mirror Tyrone’s influence, but we lack definitive proof. If Pai’s role in this war runs deeper, exposing it could be key to unraveling our larger mystery.
This week, we will retake lost ground and secure Sector Phantom Current, then launch a midweek offensive on Al Quisa and Dayr Hafir to set the stage for our Saturday convoy operation. Our final goal: establishing FOB Himmel’s Legacy deep in enemy territory as a forward staging point for future artillery strike missions. Expect fortified resistance, QRFs, and logistical challenges—our next moves will determine control of the region.
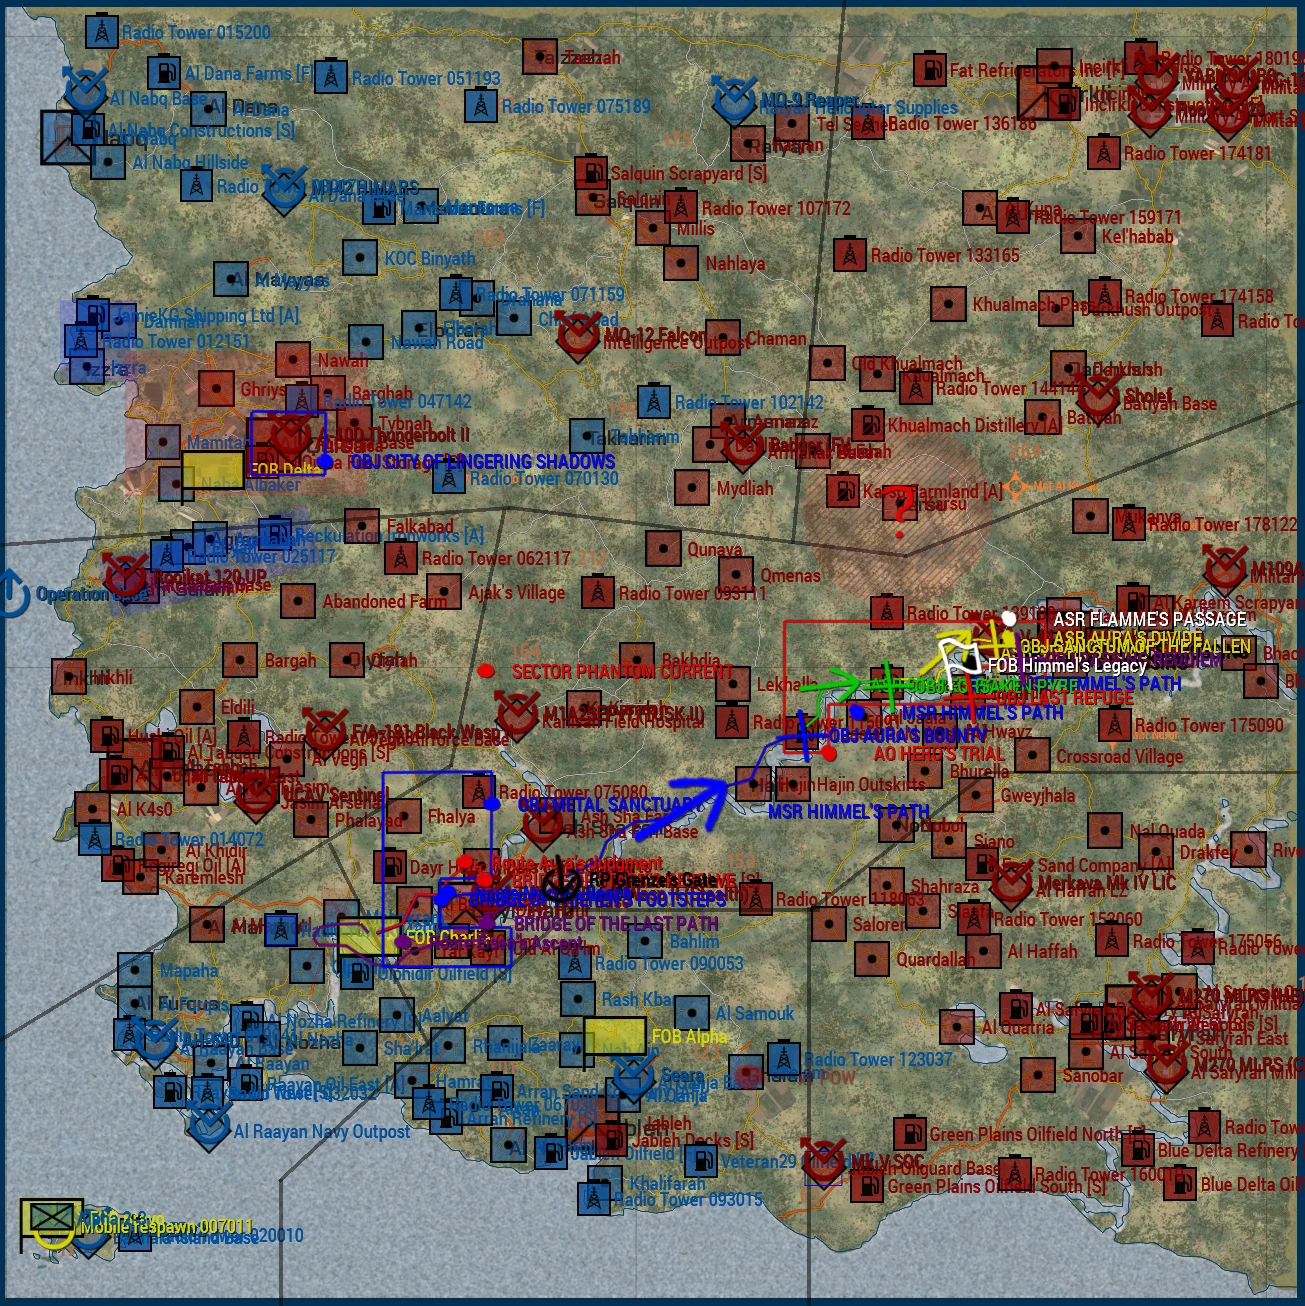
Area of Operation (AO):
{Placeholder}
Forces in Play:
Opfor:
- CSAT - Europe
Most Likely Course of Action:
Concerted efforts to delay or block our advance in the Sector.
Most Deadly Course of Action:
Heavy air and armored interception of the convoy and destruction of the 17th while en route.
Civilian Considerations:
Present throughout the AO. Any injured civilians are to be medically treated using BASIC BANDAGES. All civilian vehicles and dwellings are to be spared when at all possible. Killing civilians, destroying their property, or not treating them will give rise to potential IEDs and rebel forces arrayed against us.
Local sentiment is at all time low and we can expect IEDs and guerilla attacks on our forces at held locations and in support of CSAT
POW's:
Any and all POWs are to be sought when a location has been captured. A killed POW has the same effect as a killed civilian. First use a ZIPTIE on surrendered forces, then use ACE interact to move the prisoner and transport them to a FOB main building. THIS MUST BE A PRIORITY LOGI TASK! No POWs are to be left for pickup as they despawn. Best efforts shall be made to arrange pickup or keep POWs with the unit until pickup can be arranged.
Blufor:
- Task Force Helldivers
- VFA-2 "Bounty Hunters"
- 21st SOS "Dust Devils"
- 15th Airlift Squadron "Global Eagles"
- 36th Airlift Squadron "Eagle Airlifters"
- 17th Ranger Battalion "Otherworlders"
- 11th Airborne Division "Angels"
- Navy Task Force "Arsenal of Democracy"
- 1st Battalion, 1st Marines "First of the First"
- USAF Special Operations Squadron
- USAF Air Mobility Command
Greenfor:
- n/a
Engagement Criteria:
Military aged males are to be treated as suspect. Fire on if hostile to us.
Mission:
Execution:
Weekly Operational Plan for Sector Phantom Current
- 24/7 Operations – Retake lost ground and fully secure the remainder of Sector Sapphire Reach, ensuring CSAT and insurgent forces have no chance to regroup.
We lost Jableh and other areas. Secure sectors
- Midweek Operations – A two-phase offensive:
- OBJ CITY OF WHISPERING SHADOWS - Seize Al Quisa, its base, and fuel storage, denying enemy forces a critical logistics hub and giving us access A-10
- OBJ METAL SANCTUARY - Secure key locations northwest and south of Dayr Hafir to prepare for our next major push.
- Saturday Operation – Conduct a high-risk convoy operation upriver to establish a FOB deep in enemy territory, providing a critical stepping-off point for future search-and-destroy missions against CSAT artillery bases.
- OBJ AURA'S BOUNTY
- OBJ FORSAKEN PURE
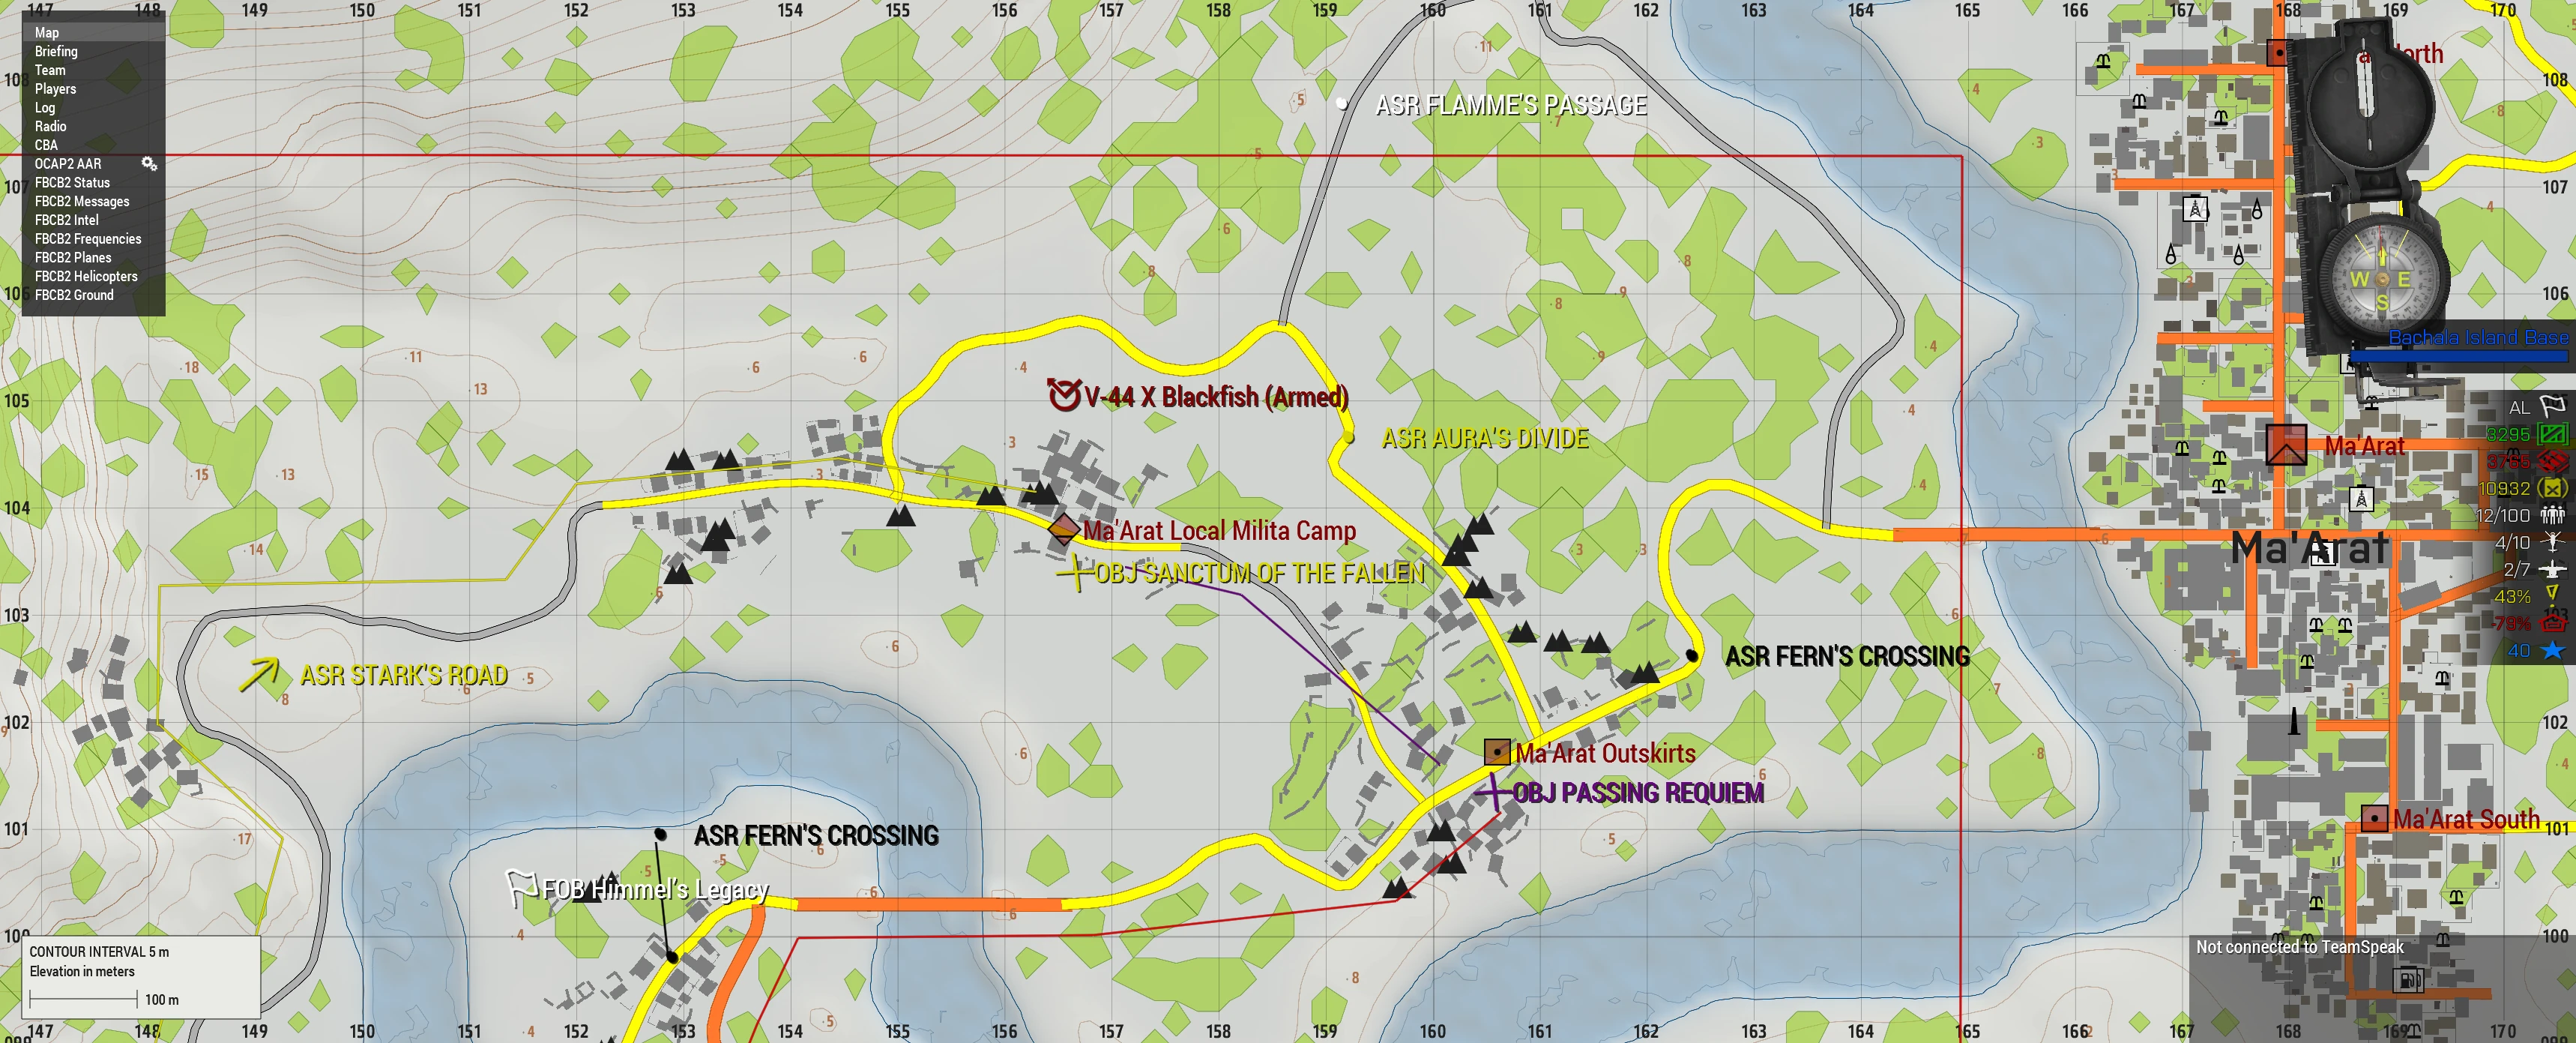
- OBJ SANCTUM OF THE FALLEN
- OBJ PASSING REQUIEM
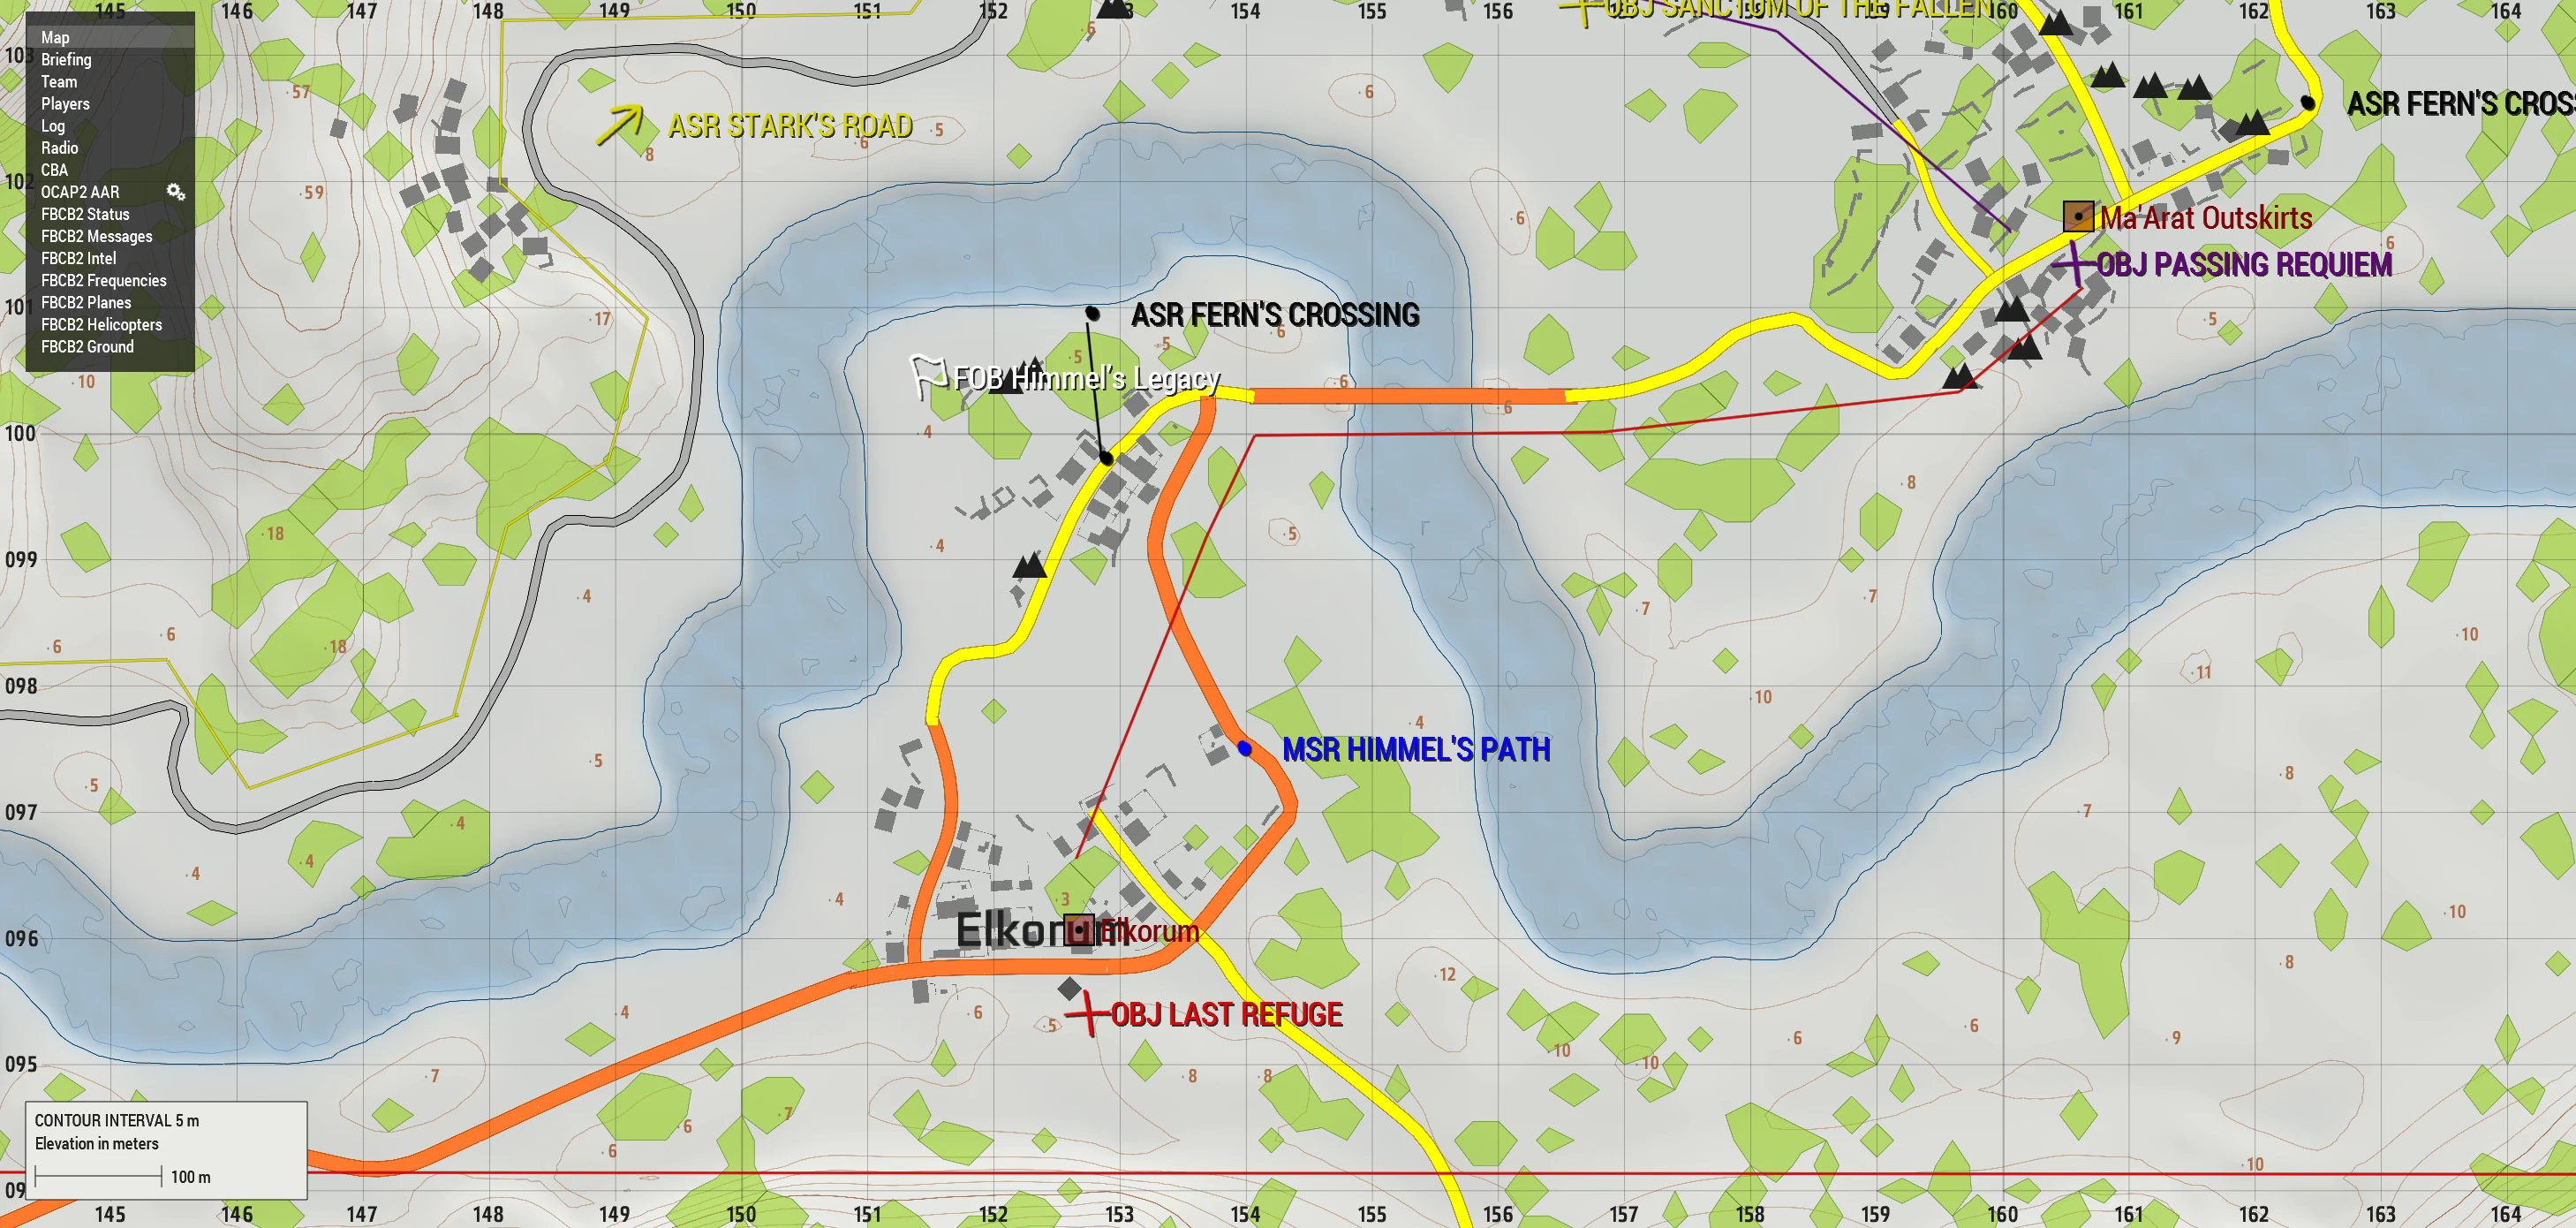
- OBJ LAST REFUGE
Expect entrenched resistance, enemy counterattacks, and logistical challenges as we push further into hostile territory. The success of this week’s operation will define our ability to project force and disrupt enemy operations beyond Sector Sapphire Reach—while bringing us one step closer to unraveling the mystery behind Tyrone’s influence.
Responsibilities:
- Alpha
- Direct action on enemy forces
- Approach and eliminate forces where possible
- Recon best approaches
- Utilize quadcopter for ISR
- Be ready for air threats and light armor
- EOD and route clearance
- Echo
- Resupply crates can be created from the 17th arsenal box which is a buildable item at a FOB
- Call in all advancing enemy formations and vehicles for situational awareness
- Be wary of enemy air and AA as the threat level increases
- All Asset initiated fire missions shall be passed through JTAC to Alpha/Echo CO for approval unless engaging on free fire runs
- Advise JTAC when going in on free fire targets
- Free fire on MBTs within 800 m of Batt. unless a tank is within range to assist
- Free Fire on BMPs, BTRs within 500 m of Batt. with precise munitions unless a tank is within range to assist
- Direct support via IFV, light armor, and CAS platforms
- Logistics for the FOB, supplies, POWs and resupplies
- Provide ISR/CAP
- CAS ROE
CONOP:
-
Phase 0: PreOp 1730 CST
- COs/XOs finalize remaining details if any
- Reevaluate Sector and Weekly progress
- Take into account any changes or intel
- NCO meeting to disseminate plan
- Slotting
- COs/XOs finalize remaining details if any
-
Phase I: Brief 1900 CST
- BCO will give final overview and expectations
- COs will brief vehicle commanders and squad leaders of final tweaks and expectations/needs
- Overview of JIPs.
- Respawn at FOB Alpha for reinsert via air
- Convoy Commander goes over Road March
- 50 LR, 50 m spacing, 50 KPH
- Convoy order of march
Mine plow Katana, Dagger 1, Warlord 1, Dagger 2, FOB Truck, Alpha Command/Dagger 3, Warlord 2, Ductape, Convoy Command
-
- Formations, reaction to contact, and recovery
- Roll through contact
- Any vic disabled will be recovered by the vic behind it by quickly moving in front, attaching ropes, and moving on
- If unable to recover vic, recover crew or leave behind, rally, and reassess when out of contact.
- Formations, reaction to contact, and recovery
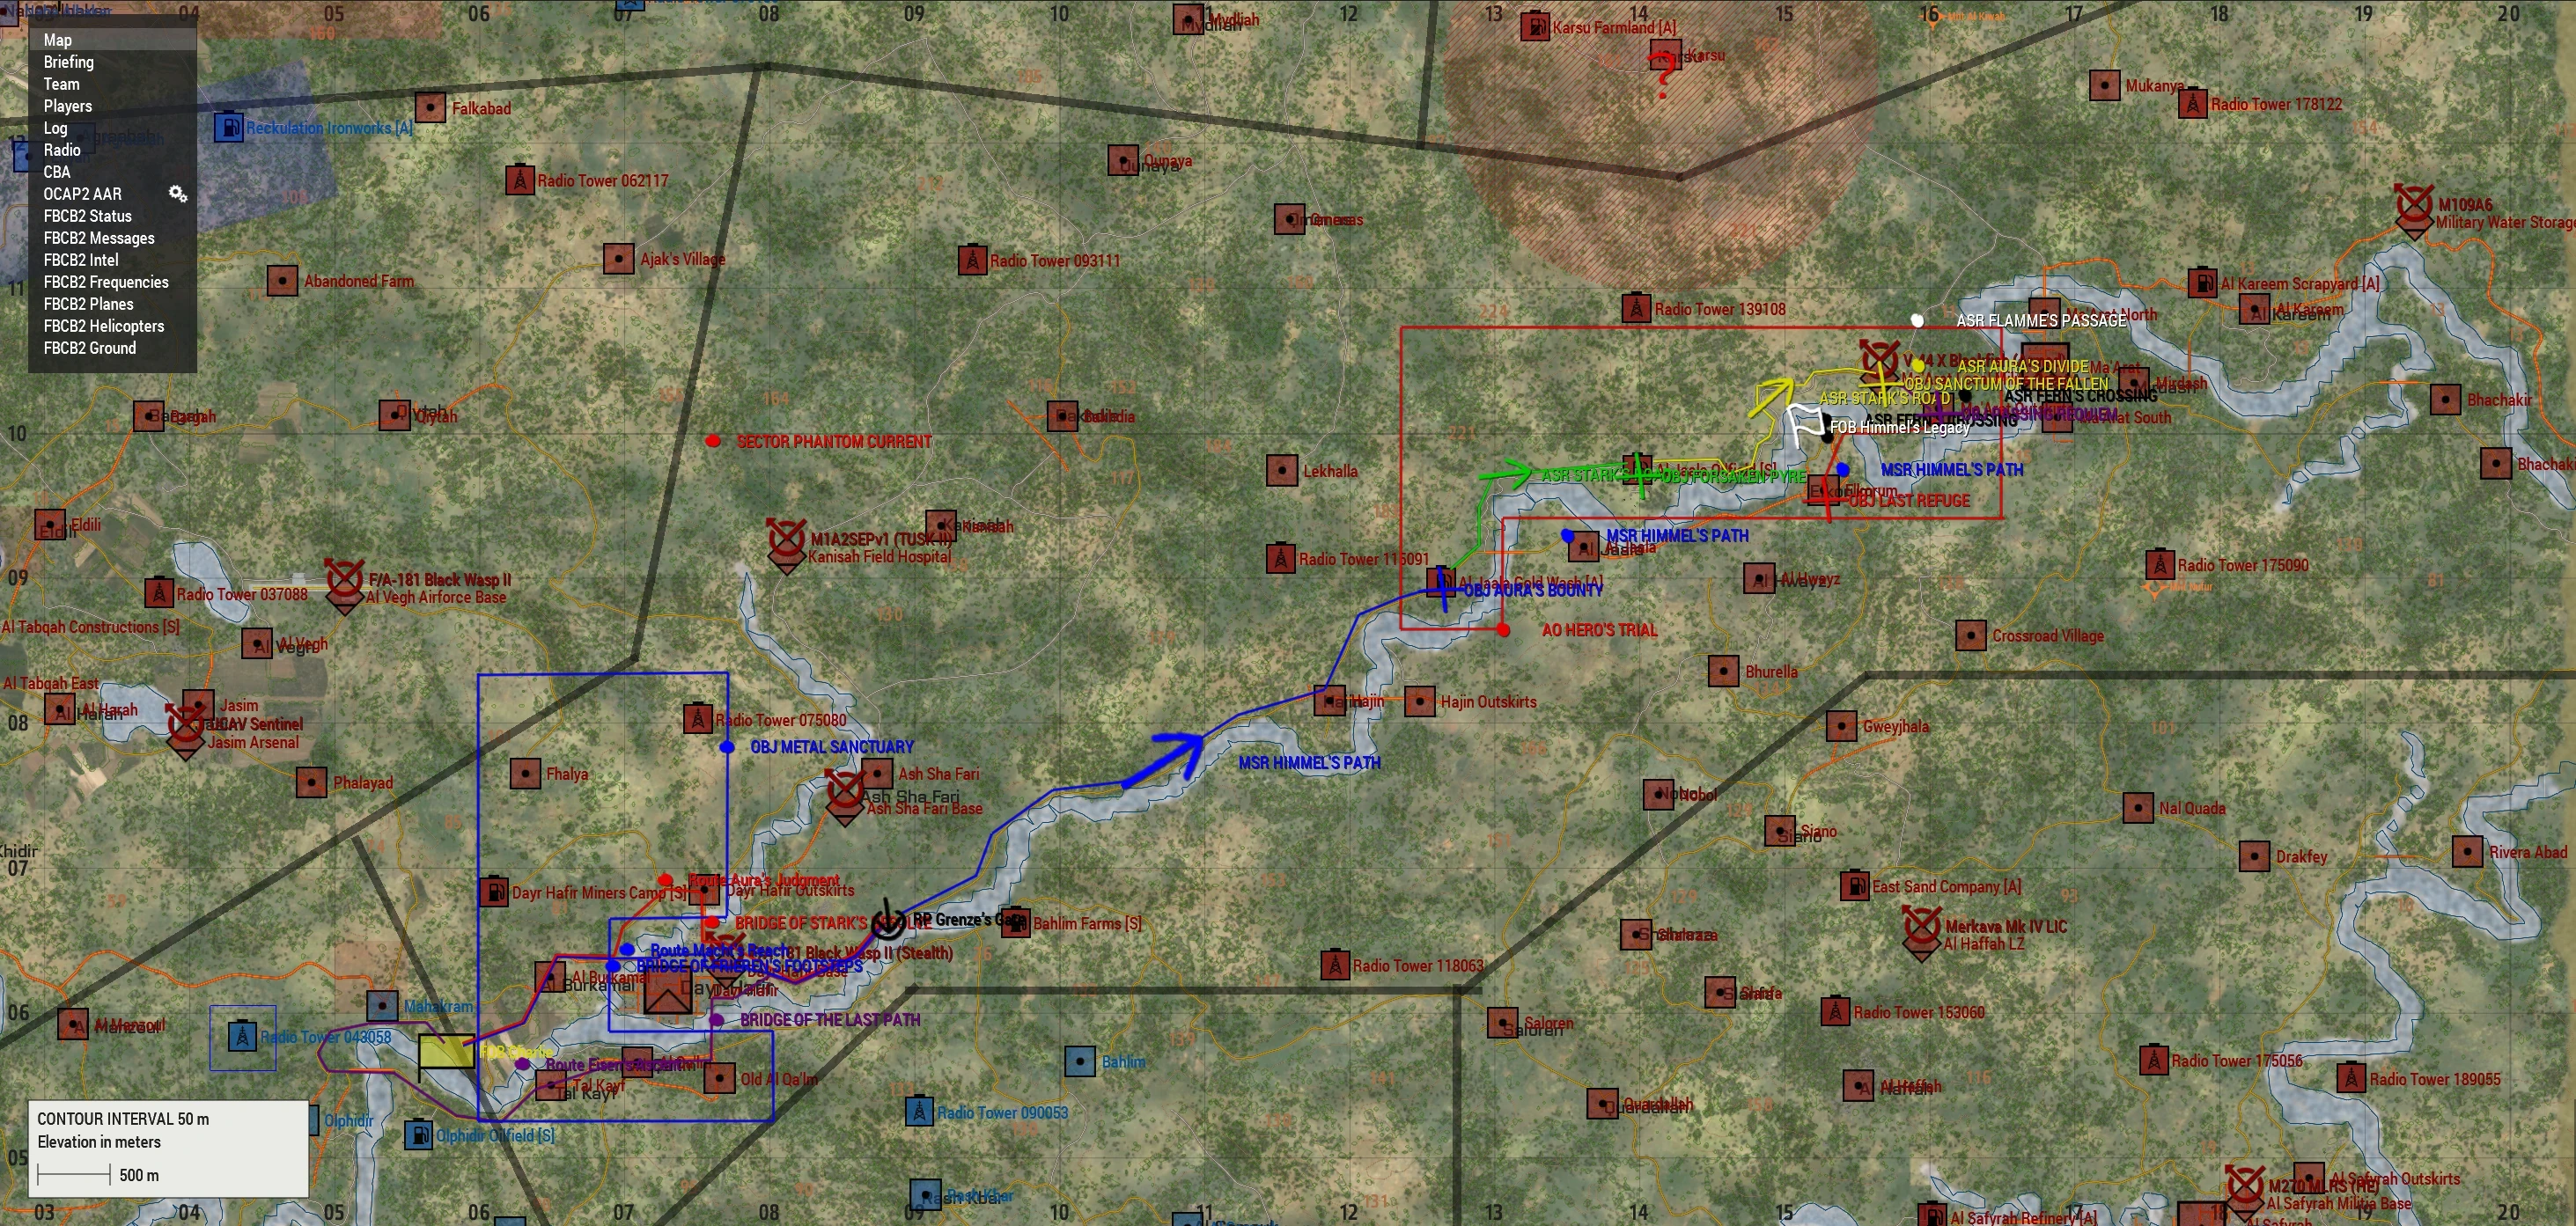
Convoy Route
-
Phase II: Prep 1905 CST
- Alpha preps vics with basic needs and AA
- Don't go overboard so that Echo can resupply and fulfill that mission
- Prep will be made to prestage vehicle replacements and resupply
- Vehicle replacements should be prepped in case of catastrophic loss in the field
- Alpha preps vics with basic needs and AA
-
Phase III: Stepoff and rendezvous at RP Grenze's gate 1915 CST
- Depart FOB Charlie via one of three designated routes:
- Primary Route: Route Aura’s Judgment → Bridge of Stark’s Resolve
- Secondary Route: Route Macht’s Reach → Bridge of Frieren’s Footsteps
- Tertiary Route: Route Eisen’s Ascent → Bridge of The Last Path
- Depart FOB Charlie via one of three designated routes:

-
- Secure crossings and clear enemy resistance along the selected route.
- Soft Dismount 100m from bridge along route of choice and cross if able
- EOD ensure bridge is clear of IEDs
- LAV's will effect an amphibious crossing if called to establish forward control for convoy
- Soft Dismount 100m from bridge along route of choice and cross if able
- Regroup and reorganize at RP Grenze’s Gate, ensuring all convoy elements are accounted for and combat-effective before proceeding into Phase 4
- Secure crossings and clear enemy resistance along the selected route.
-
Phase IV: ROAD MARCH
- Depart RP Grenze’s Gate and begin the convoy movement along MSR Himmel’s Path toward AO Hero’s Trial.
- Push through contact and keep up momentum

-
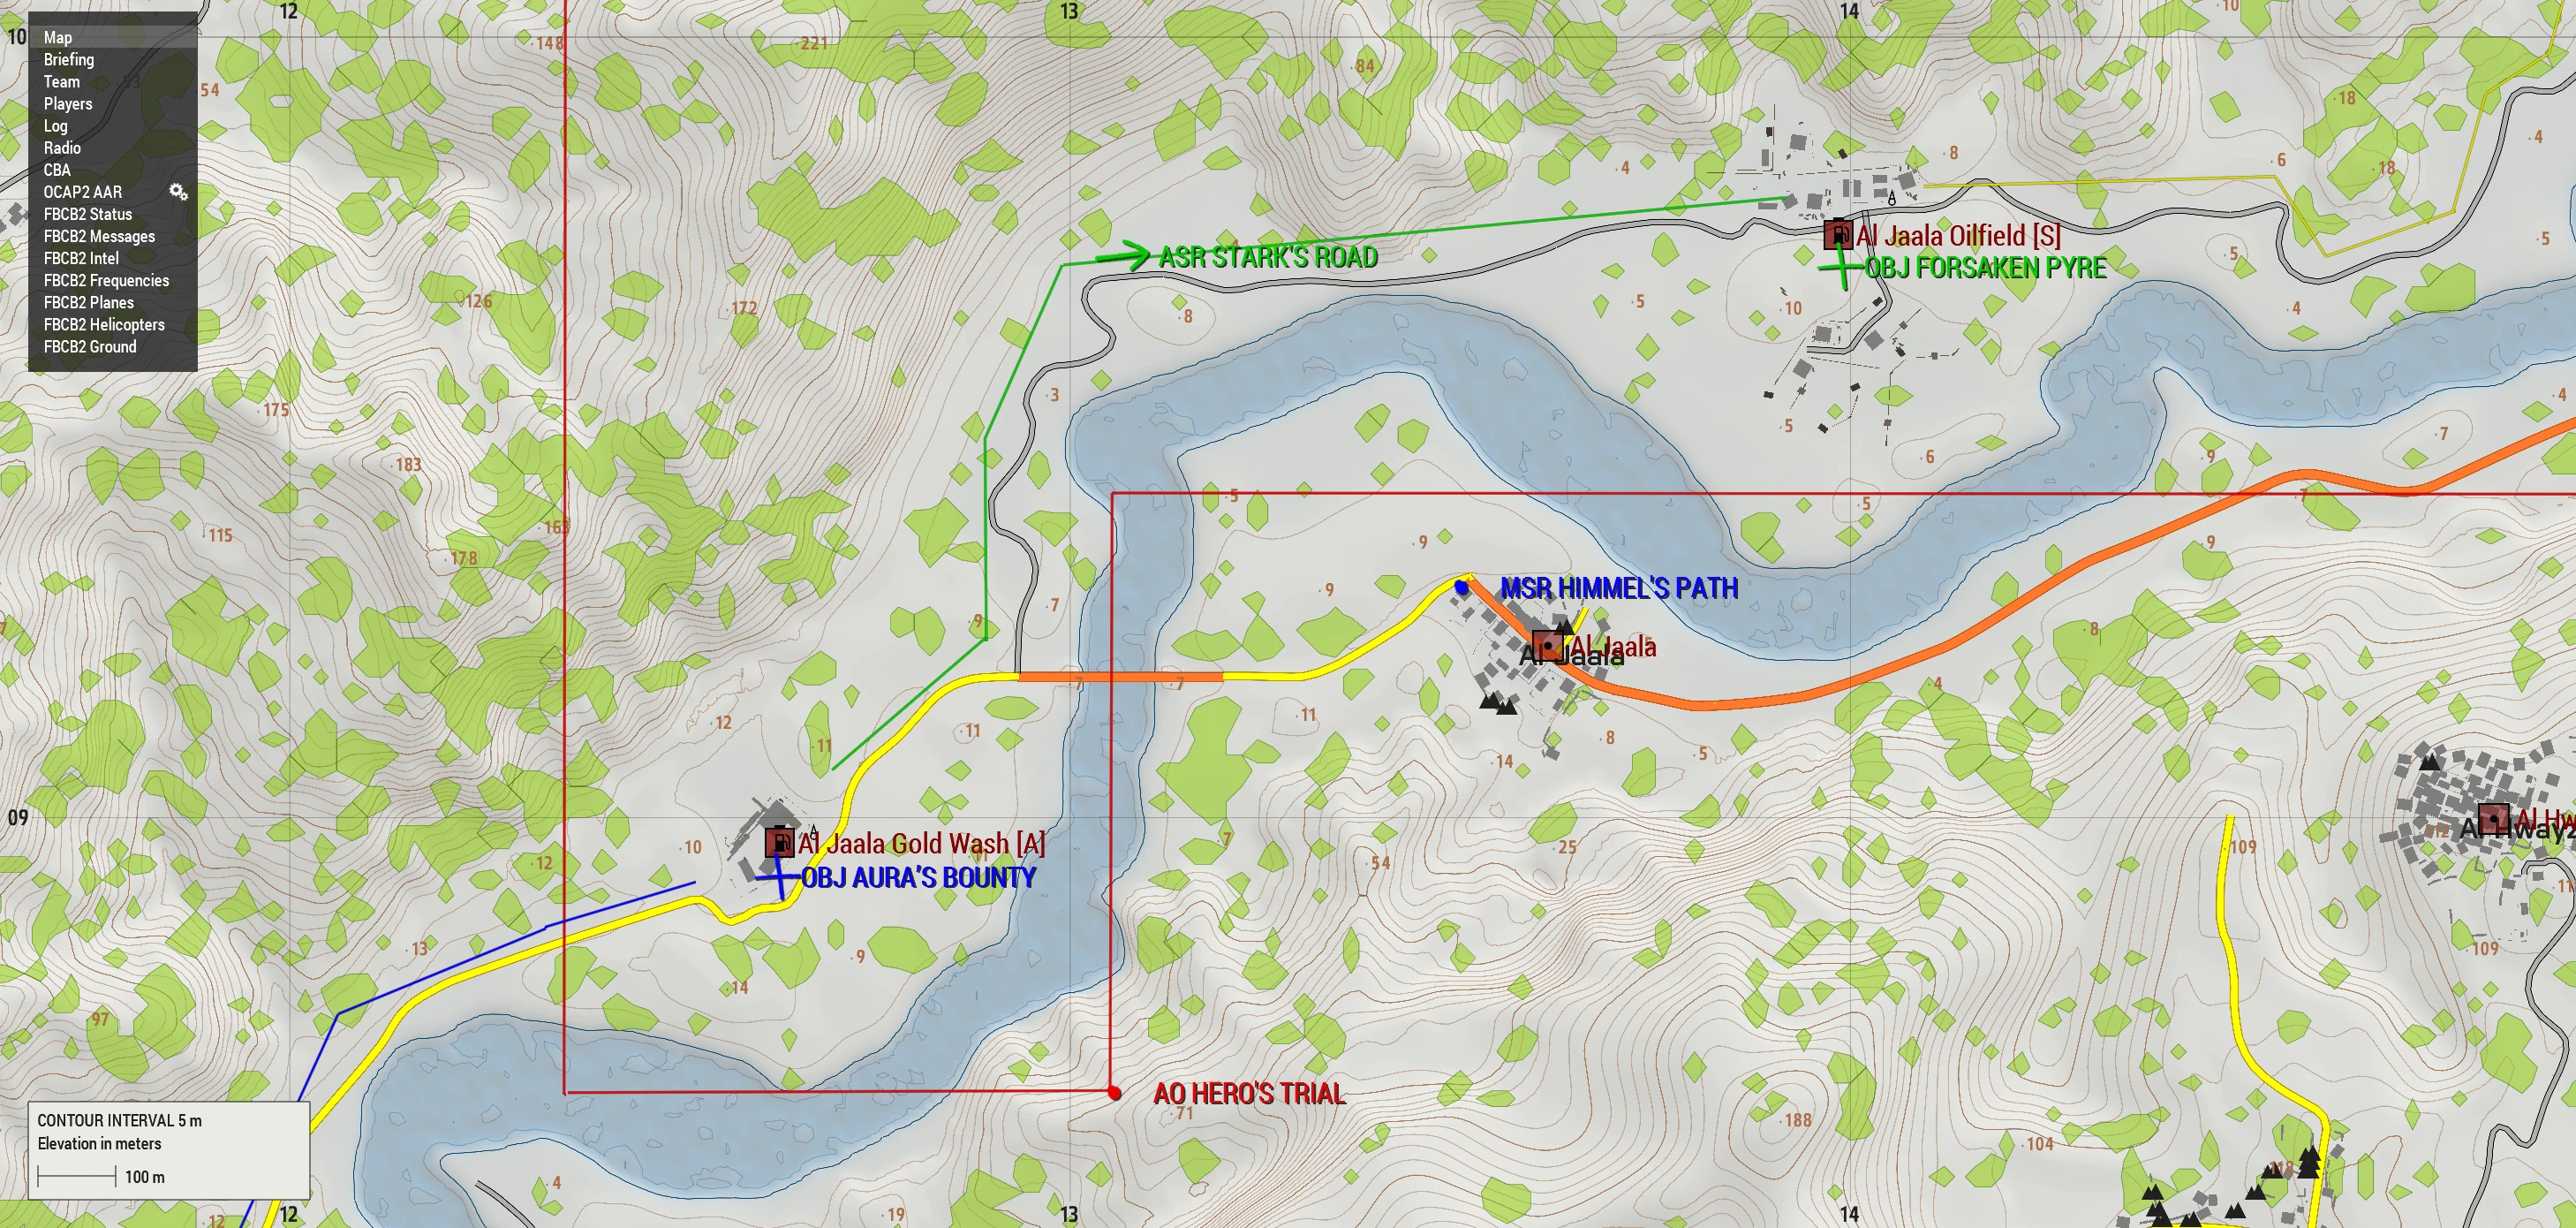
Phase V: OBJ AURA'S BOUNTY and OBJ FORSAKEN PYRE
- Pre-Assault Preparations:
- CAS strikes hardened targets at OBJ AURA’S BOUNTY and OBJ FORSAKEN PYRE
- Convoy Approach:
- Convoy speed reduced to 20 KPH upon nearing OBJ AURA’S BOUNTY.
- LAVs move to line-abreast formation at the head of the column 300m from OBJ AURA’S BOUNTY straddling the road
- Alpha/Auxiliary vehicles remain in column formation behind the minesweeper.
- OBJ AURA’S BOUNTY Assault:
- LAVs take flanks to provide suppressive fire on enemy positions.
- Alpha dismounts and clears buildings while maintaining security on approach routes.
- Convoy reforms after securing OBJ AURA’S BOUNTY in preparation for the next phase.
- OBJ FORSAKEN PYRE Assault:
- Rinse and repeat
- Resupply if necessary
- Pre-Assault Preparations:
-
Phase VI: OBJ SANCTUM OF THE FALLEN and OBJ PASSING REQUIEM
- Pre-Assault Preparations:
- ISR and recon assets identify enemy positions and movement patterns in OBJ SANCTUM OF THE FALLEN and OBJ PASSING REQUIEM before approach
- Convoy Approach & Engagement:
- Soft dismount initiated upon reaching engagement range with enemy contacts, as determined by ISR and recon.
- LAVs and Alpha elements engage enemy forces while advancing, clearing through resistance dynamically.
- A screening force/CAS positions to the North of the objectives to prevent enemy reinforcements from flanking the assault force.
- Once secured, forces regroup and prepare for the final push toward OBJ LAST REFUGE.
- Pre-Assault Preparations:
-
Phase VII: OBJ LAST REFUGE
- Pre-Assault Preparations:
- ISR scans the bridge and surrounding terrain for enemy positions, potential ambush points, and suspected IED locations.
- CAS on standby to engage any enemy forces attempting to disrupt the crossing or reinforce
- Crossing Operations:
- Nitrate clears IEDs along the bridge to ensure a safe passage for the convoy.
- LAVs ford the river, securing the far side and establishing an overwatch position to support the crossing.
- Blocking force and command teams hold rear security, establish FOB
- OBJ LAST REFUGE Assault & Security:
- Forces push South to establish a defensive perimeter, preventing enemy movements from the deeper AO.
- Pre-Assault Preparations:
-
Phase VIII: RP/AAR
-
All units prepare for debrief.
-
Imagery:
Timeline (in CST)
Command and Signal
Long Range Frequencies:
- Command 45
- RTO 45, 35
- Alpha Lead 40
- Flight Lead 45, 30
- Pilots 30, 35
- Echo Lead 45,80
- RRC 69
- Convoy 50
Nonverbal Coordination:
- Green: This is used to mark friendly positions on the field.
- Blue: Marking suitable locations for Landing Zones.
- Red: This is used for marking enemy positions for all units to reference.
- Yellow: This is used to inform friendly forces that Immediate medical support is needed.
- Purple: This color represents a friendly position with enemy units danger close, Anyone outside of 100 meters away from the smoke should be assumed hostile.
- Orange: This tells anyone in the air that a friendly unit is in desperate need of resupply.
Call signs for Supports:
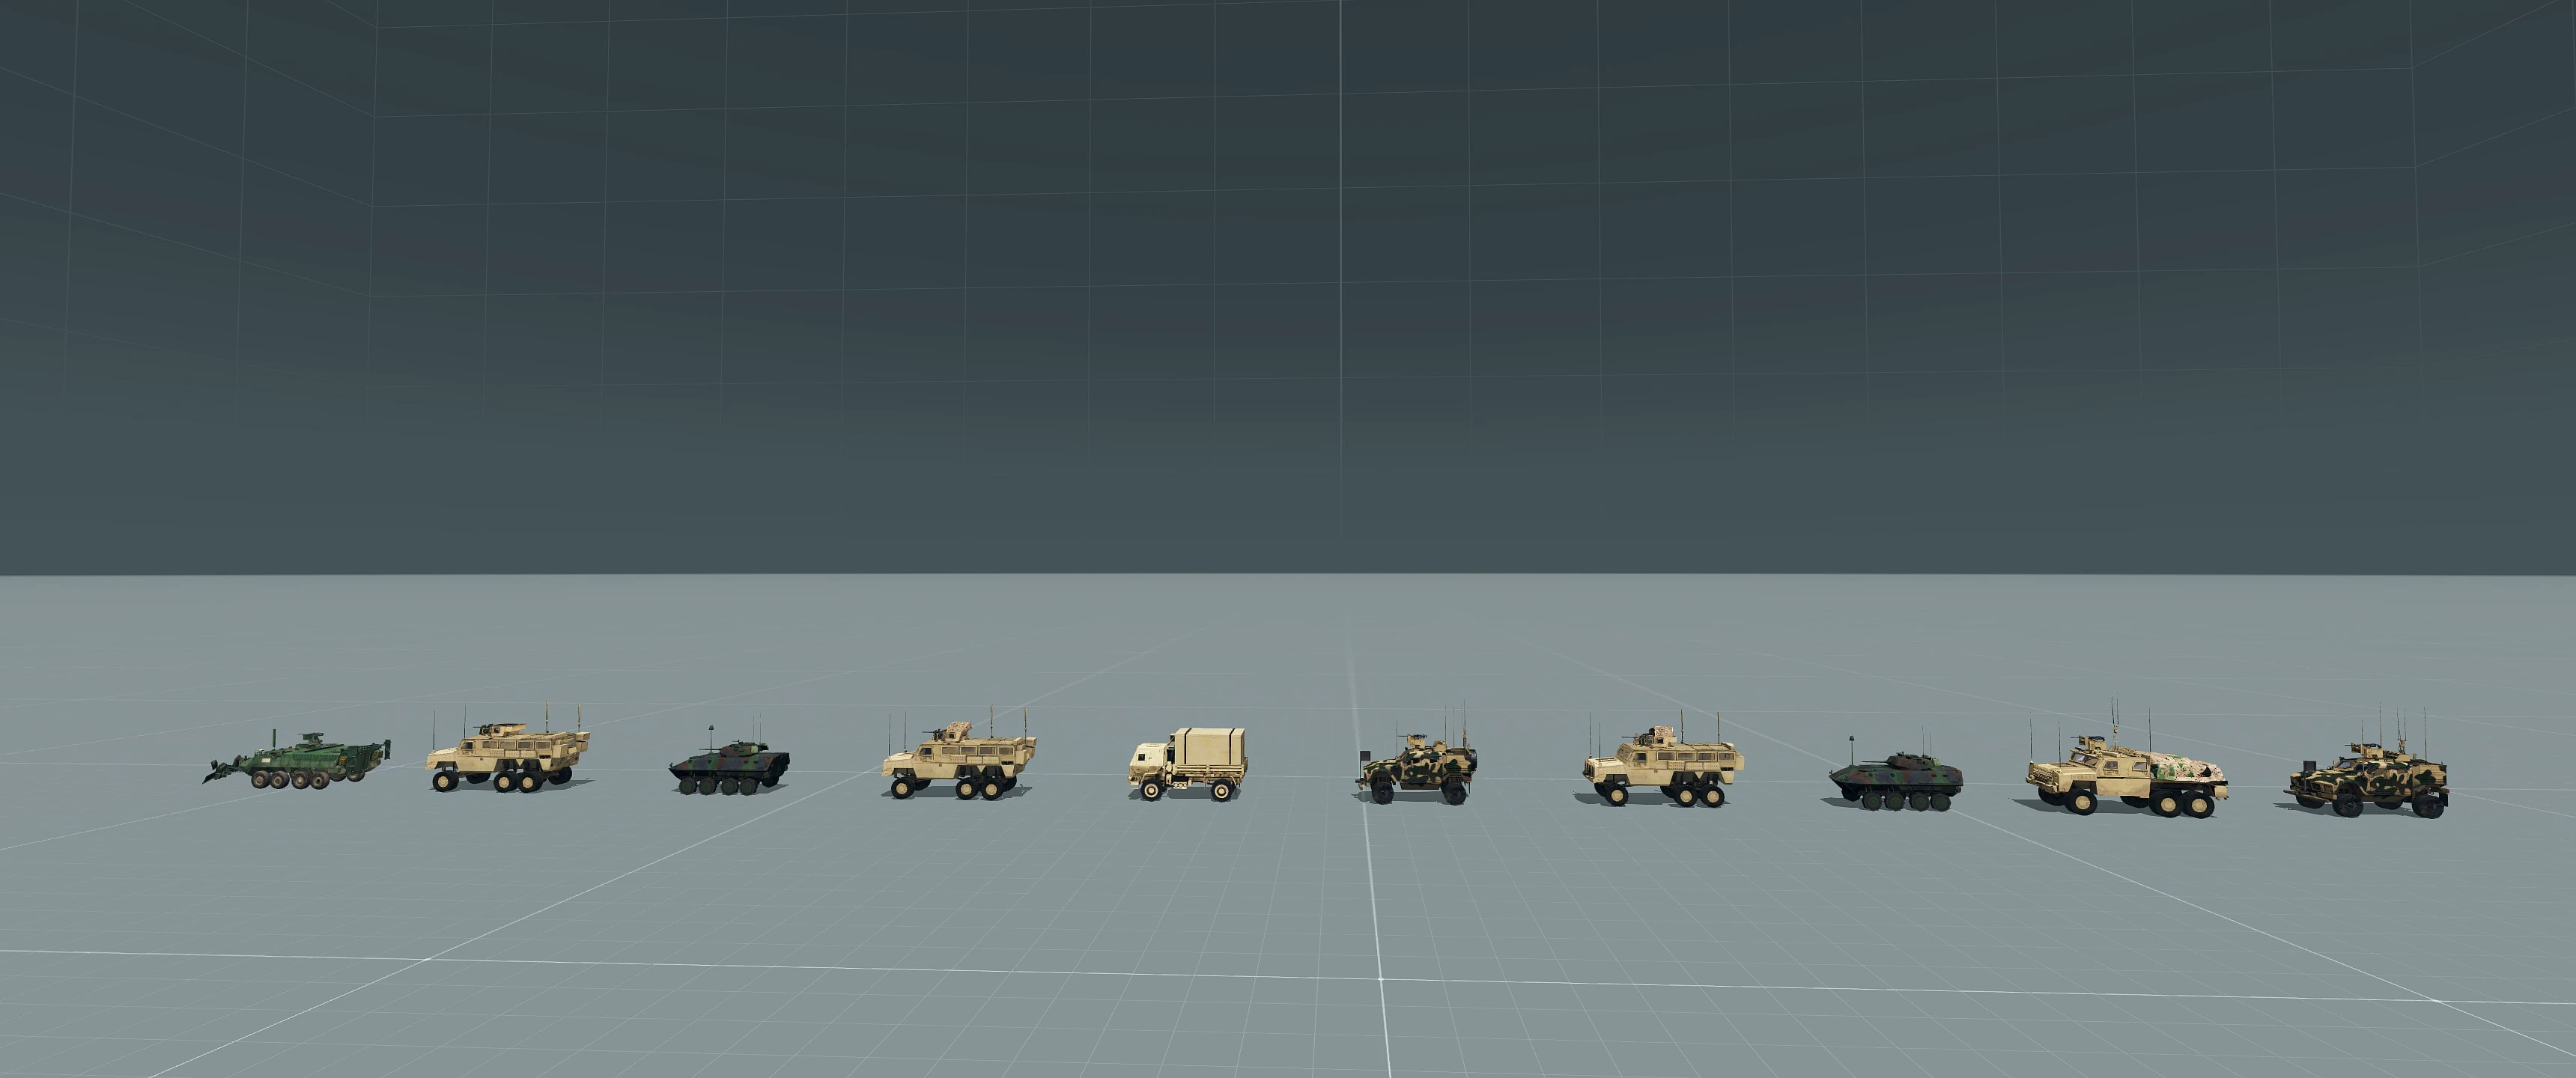
Available Assets:
- Gun Truck JLTVs
- LAV-25
- N/A
- F-181 Black Wasp Heavy
- MH-60M DAPS
- MH-6M
- AH-6M
- CH-47
- V-22
- C-130
- C-17
- Falcon UAV