
Opord
Operation Order 007
Situation
Time: 1630am
Weather: Unknown
Tyrone's long range artillery capabilities have been crippled. We believe we now have the upper hand in the region. Our task this week is to Destroy whats left of Tyrones Ion Group and Syndicate Allies
Area of Operation (AO):
Western Columbia
Forces in Play:
Opfor:
- Syndicat backed by PMCs.
Most Likely Course of Action: Commandos will provide actionable intel on enemy weak points that the battalion will strike.
Most Dangerous Course of Action: It's a trap. Meet up point centrally located in three no fly zones and 4 of the 5 objectives.
Blufor:
- 17th Ranger Battalion.
- Columbian Commandos.
Greenfor:
- n/a
Engagement Criteria:
Rules of Engagement: Engage at discretion of line leaders. Full destruction of military assets and structures is approved.
Civil Considerations: Destruction of civilian infrastructure will not be tolerated, excluding structures occupied by enemy forces
Mission:
Execution:
Alpha:
- Assault primary Objectives.
- Seek out secondary targets of opportunity
Echo:
- Provide CAS support via MH-60M (DAP) = "Hades" and AH-6M Attack = "Artemis" Assets
- "Hades" Assets will also be responsible for logistical considerations.
Special Considerations:
- Utilization of Pathfinder is not recommended for the operation, however up to two Drone Operators would not be unwise.
- Red zones are NO FLY zones. Enemy AA capabilities in the area are still very functional.
- Pentistar Elite is here, hide your CAS parts.
Objectives:
Primary Objectives
- Destroy/Eliminate/Capture Objectives identified by Commando element
Secondary Objectives
- Kill or Capture Ion Senior Commanders(They wear Berets)
- Destroy all enemy equipment
- Neutralize all hostile threats
- Be prepared to defend if a counter attack happens
CONOP:
This operation will be conducted in 6 phases. At 7:00pm briefing will take place. At no later than 7:15pm All units will be kitted up and loaded in their respective transportation.
-
Phase 0: Briefing
- 6:45pm CST server will be open to enter. Briefing starts at 7:00pm. Preparation to step off follows. This may include preparing vehicles with supplies, organizing elements and fire-teams into appropriate roles, loading into transport for early step off if possible. At no later than 7:15pm the Battalion will step off.
-
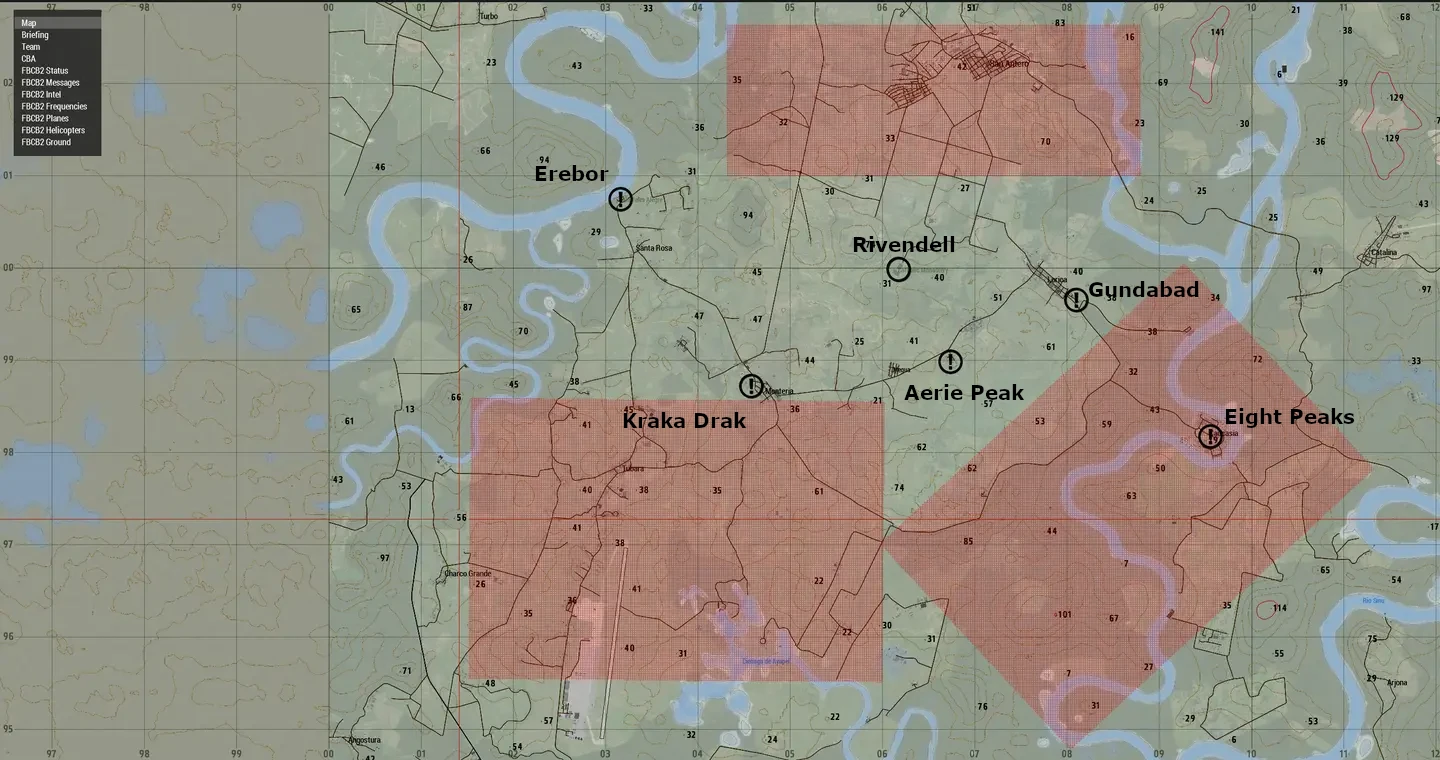
Phase I: Rivendell
- Battalion will move together and insert just west of Rivendell. One chalk will stay in the air and be on standby to move to a priority target if identified. The other chalk land and move to meet up with Columbian informants to receive intel on surrounding objectives.
- Battalion HQ will be inserted via Chinhook with 1x MRAP for sustainabilty
- Intel given may result in Phase order shifting. Phases are in order of convenience sweeping west to east. Be adaptable.
- Battalion will move together and insert just west of Rivendell. One chalk will stay in the air and be on standby to move to a priority target if identified. The other chalk land and move to meet up with Columbian informants to receive intel on surrounding objectives.
-
Phase II: Erebor
- Battalion will move together to clear the lonely objective.
-
Phase III: Kraka Drak
- Alpha will split forces to clear Kraka Drak and Aerie Peak simultaneously.
- Objectives will remain separate phases as a precaution to unknown intel.
- Alpha will split forces to clear Kraka Drak and Aerie Peak simultaneously.
-
Phase IV: Aerie Peak
- Alpha will split forces to clear Kraka Drak and Aerie Peak simultaneously.
- Objectives will remain separate phases as a precaution to unknown intel
- Alpha will split forces to clear Kraka Drak and Aerie Peak simultaneously.
-
Phase V: Gundabad
- Alpha will regroup to clear out Gundabad and prepare for final move towards Eight Peaks
-
Phase VI: Eight Peaks
- Battalion will push into enemy territory and re-attempt to take Eight Peaks from a stubborn enemy.
-
Phase VII: RP/AAR
-
All units prepare for debrief.
-
Imagery:
Timeline (in CST)
6:45pm: Organize units, and kit up
7:00pm: Operation Brief
7:15pm: Operation Start
10:30pm: All OBJ cleared, prepare for AAR.
Command and Signal
Long Range Frequencies:
- Command 45
- RTO 45, 35
- Alpha Lead 40
- Flight Lead 45, 30
- Pilots 30, 35
- Echo Lead 45,80
- RRC 69
- Convoy 50
Nonverbal Coordination:
- Green: This is used to mark friendly positions on the field.
- Blue: Marking suitable locations for Landing Zones.
- Red: This is used for marking enemy positions for all units to reference.
- Yellow: This is used to inform friendly forces that Immediate medical support is needed.
- Purple: This color represents a friendly position with enemy units danger close, Anyone outside of 100 meters away from the smoke should be assumed hostile.
- Orange: This tells anyone in the air that a friendly unit is in desperate need of resupply.
Call signs for Supports:
Airframes
- MH-6M Transport = "Apollo"
- AH-6M Attack = "Artemis"
- OH-6M Scout = "Icarus"
- CH-47F Chinook = "Achilles"
- MH-60M (DAP) = "Hades"
- UH-60M Transport = "Griffin"
- UH-60M Medical = “Dustoff"
- Blackfish (support) = "Pegasus"
- Blackfish (attack) = "Chimera"
- AH-64D Apache = "Orion"
- A-10 Warthog = "Ares"
- A-29 Super Tucano = “Odyssey"
- C-17 Globemaster III = "Titan"
- C-130J Super Hercules = "Hercules"
- F/A - 181 = “Xerxes”
Ground Vehicles
- M1165A1 Humvee = "Dagger"
- M1117 ASV = "Tanto"
- M1132 Stryker = "Katana"
- Badger IFV = "Rapier"
- M2A3 Bradley = "Sabre"
- M1A2 Abrams = "Claymore"
- Rooikat 120 = "Gladius"
- M142 HIMARS = "Halberd"
- M109 Paladin = "Glaive"
- Mk6 Mortar Team = "Hammer"
- 105mm Howitzer = “Mailman”
- MK.V SOC = "Poseidon"
- Speedboat Minigun = "Neptune"
- RHIB = "Trident”
Available Assets:
Air Assets
- 2x MH-60M (ESS) = "Hades"
- 2x AH-6M Attack = "Artemis"
Ground Assets
- 1x MRAP
- N/A
Disengagement Criteria
- Disengage when faced with 2 or more heavily armored combat vehicles. Or dismounted patrols that exceed 5 to 1 forces ratio.
Mission failure criteria
- All Rangers in field are KIA or Unconscious.