
Opord
Situation
“We keep our manners and our ground.”
Following the decisive interdictions that began with the night raid on Kirkonkyla and continued through Route Jason, NATO’s attacks shredded Vympel 322’s maritime lifelines and forced insurgent cadres into chaotic exfil. In the weeks since, interdiction and checkpoint operations—culminating in the convoys destroyed last night—broke the insurgents’ freedom of movement but did not erase the strategic problem: foreign conventional forces and CSAT elements have moved to occupy that vacuum. Intel now shows organized mechanized brigades and armored columns massing east of Route Jason, rehearsing bridge-laying and engineer-supported breaches for a deliberate westward drive. Helicopter assault packages and gunship pairs are staging from southern littoral points while EW activity has increased, producing GPS and datalink outages that complicate ISR and close-air integration. Civilians remain hunkered down in towns and basements; trust is frayed and secondary roads are crowded with displaced traffic, complicating identification and force employment. 17th Ranger elements have been emplaced in depth—fortifying OBJ Mercury with prepared fallback belts at OBJ Venus and OBJ Mars—while SIGINT/ELINT teams hunt for jammer emitters and engineers ready anti-armor obstacles and demolition plans. In the hours before the invasion, pre-registered fires missions, ATGM sectors, and lanes of denial are being finalized; sustainment nodes at FOB Whiteclaw and Michelob Airbase stand ready to feed the fight. The operational picture is clear: last run’s tactical successes created the conditions for a larger conventional challenge, and now the 17th must convert battlefield patience into a deadly, coherent defense to stop a westward invasion before it reaches friendly depth.
Hold Route Jason in depth—bleed and cause attrition to the mechanized thrust, preserve combat power for the fight afterward, and deny CSAT any foothold west of our lines so higher command can regain the initiative.
Area of Operation (AO):
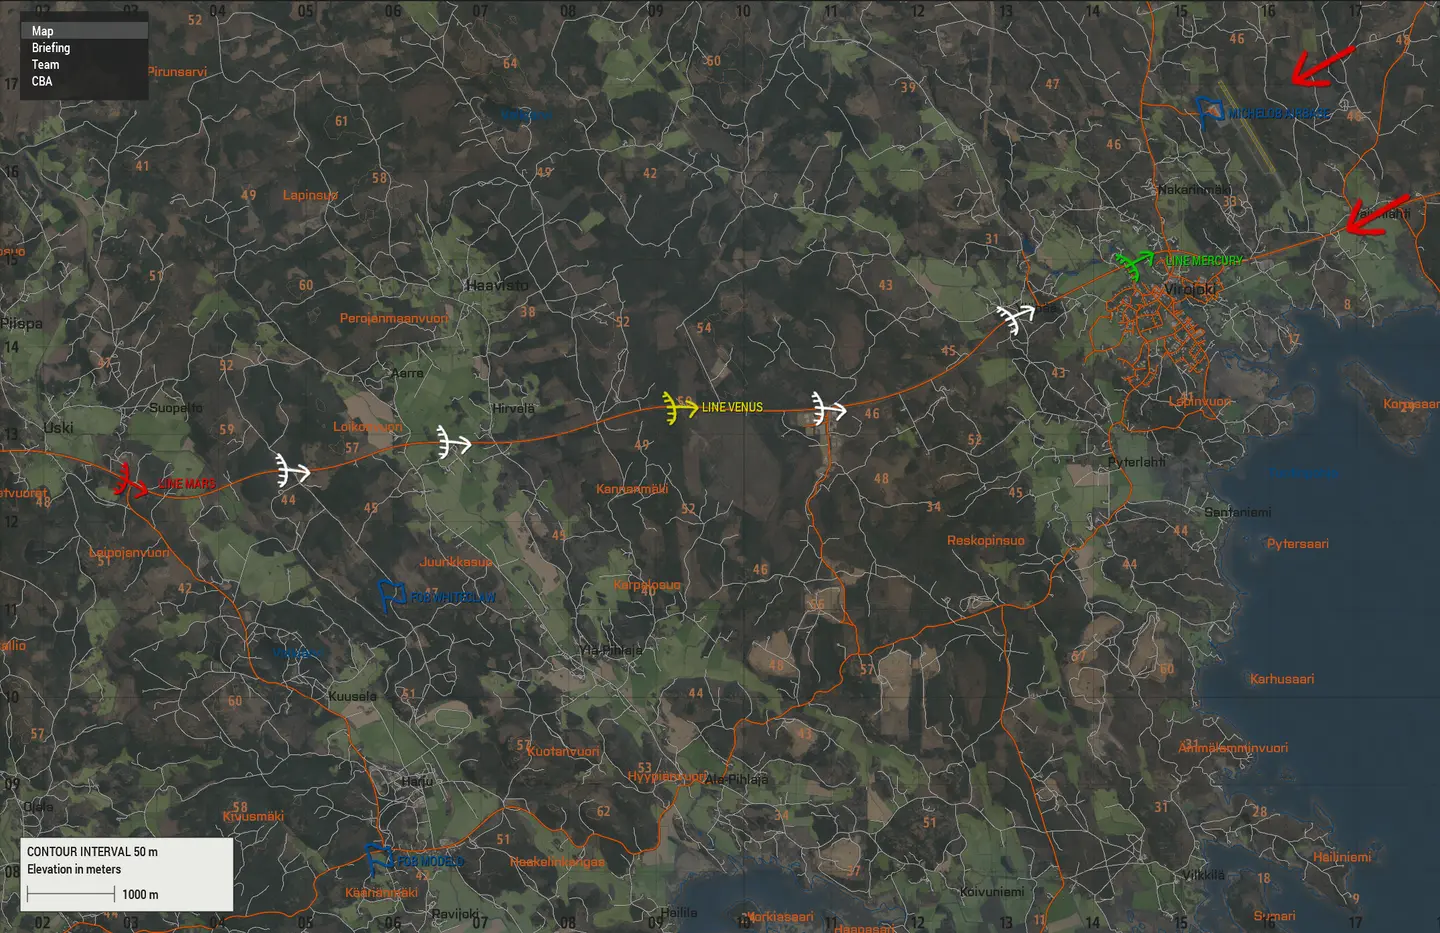
Forces in Play:
Opfor:
- NAPA insurgents, possible CSAT Russian advisors
- CSAT mechanized formations likely
- Most Likely Course of Action:
Consistent and reinforced mechanized spearheads down Route Jason with helicopter support - Most Deadly Course of Action:
Envelopment and flanking maneuvers to cut off the 17th from friendly forces - Civilian Considerations:
High presence. All individuals must be PID. Fire only when fired upon or sure of enemy presence. Treat all civilians with caution as sentiment against us is still high and they may turn especially this near to the CSAT base.
NCOs shall bring Bananas to give civilians when found.
Blufor:
- Task Force Kingsman
- 17th Ranger Battalion "Arthur"
- 9th Air Commando Group "Whiskey"
- 74th Special Forces Group "Lancelot"
- USAF Special Operations Squadron
- 55th SOS "Night Hawks"
Greenfor:
- N/A
Engagement Criteria:
- Engage any armed individual in CSAT camo.
- Military aged males are to be treated as suspect. Fire on if hostile to us ONLY.
- Vehicles must be left alone unless high degree of VBIED is determined. Civilian vehicles will be in the AO and will look like enemy vehicles but all members SHALL hold fire until confirmed hostile.
Mission:
- Iceberg and 17th rules and policies apply at all times.
- Any Midweek Ops must be conducted by 4 minimum members led by an NCO.
- Note NCOs shall bring Bananas to help civilians encountered.
- All teams regardless must have an Interpreter slotted.
- Any wrecks created by vehicle/airframe loss at any time must be recovered to the Airfield as Assets are limited.
- All losses shall be reported to command staff and best efforts made to form a party to recover them.
- Sling load and towing are options as is a flatbed HEMMT at the airfield
- Take care to read up on contamination and decon procedures
- BCO or BXO approval is required for attempting to engage enemy Hideouts. If found advise of location and retreat.
Responsibilities:
- Powerline
- Provide strategic oversight and formulate Saturday's plan of action TBD by patrol actions.
- Maintain communication across phases and sectors.
- Organize and call for staggered withdrawals and establishment of new positions
- Battalion HQ will be with Echo ground
- Alpha
- Throughout the week conduct side missions to raise civilian morale and trust further
- Provide LPs, static defense, and reaction to contact
- Echo
- Air Logistics
- Provide rotary transport throughout the region
- CAS
- Establish prefire missions to cover withdrawals and eliminate flanking forces
- Logistics for the FOB, supplies, POWs and resupplies
- CO will advise on where if any to establish FARPs
- Air Logistics
Objectives:
- 24/7 Operations
- Conduct patrols throughout the AO and note avenues of attack along with ideal fire lanes for our prepared positions.
- Seek out weapons caches and try to assist civilian reputation.
- Midweek Objective
- Patrol the region along route Jason to ensure it will be clear for our maneuvers.
- Ensure FOBs Modelo and Whiteclaw are stocked with spare vics and supplies.
- To best prepare the populace for this evacuation and garner more goodwill all elements shall work to increase reputation.
- Saturday's Operation
- Alpha will prepare positions and obstacles for entrenched defense in depth.
- Echo provide CAS and a vehicle force to augment Alpha while eliminating heavy armor and air assets.
- PSI Bandit will assist with plugging the gaps and ensuring our flanks are secure.
CONOP:
-
Phase 0: PreOp 1730 CST
- COs/XOs finalize remaining details if any
- Reevaluate Weekly progress
- Take into account any changes or intel
- NCO meeting to disseminate plan
- Finalize slotting
- COs/XOs finalize remaining details if any
-
Phase I: Brief 1900 CST
-
- BCO will give final overview and expectations
- COs will brief vehicle commanders and squad leaders of final tweaks and expectations/needs
- Overview of JIPs:
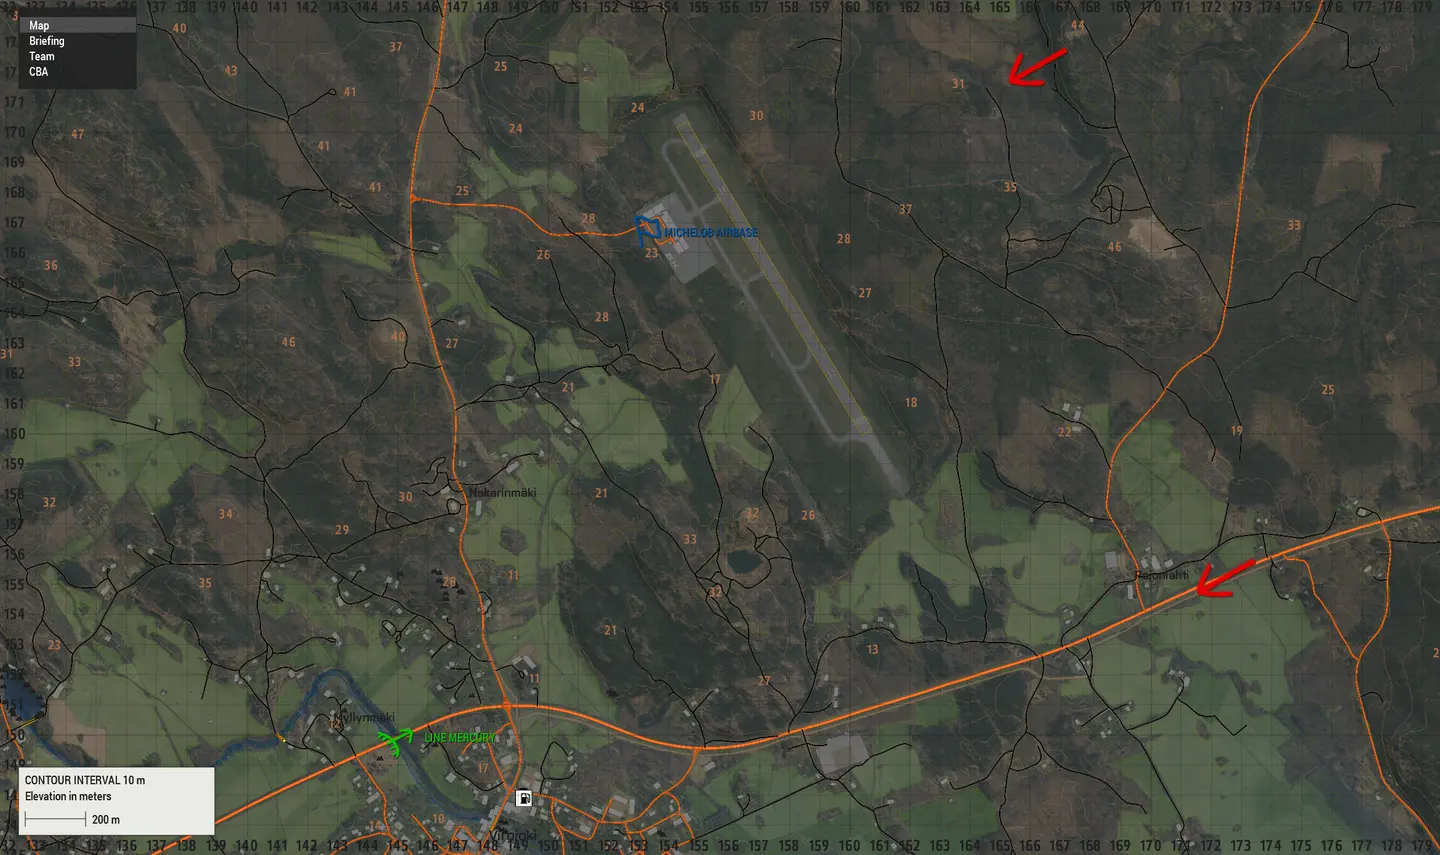
- Initial spawn at Michelob Airbase
- Respawn and JIPs will spawn at FOB WHITECLAW and be reinserted to available LZs or driven to AO
- FOB Modelo to be used for JIPs if LINE VENUS falls
- Establishment of elements DRAGOON and BASTION
- DRAGOON shall be Kingpin 1, PSI, Alpha HQ, and attached Echo assets.
- BASTION shall be Kingpin 2, HHC with the fortify vehicle, and attached echo assets.
- Fall back procedure
- When falling back to the next line in depth, BASTION shall displace FIRST and move to the first bounding RP while DRAGOON shifts positions/fields of fire to keep the enemy down.
- Once set, DRAGOON will displace from the line of defense, pass through BASTION to the next bounding RP, establish/report set, and standby.
- BASTION will again displace and move to the next line of defense to set up/prepare defenses.
- Once Bastion arrives and occupies initial positions, DRAGOON shall skirmish back to the established line to give BASTION time to prepare.
-
-
Phase II: Prep 1905 CST
- Alpha preps kits and reviews comms contingencies
- Echo finalizes logistics and preps to transport Alpha to establish LINE MERCURY
- CAS establishes free fire zones on the flanks and emergency contingencies for BROKEN ARROW
- Broken Arrow is a call to destroy anything danger close to friendly positions. Should this be called, IMMEDIATELY on sight of smoke all ground forces are to get to within 100 meters of the smoke and air is to destroy anything beyond that perimeter.
-
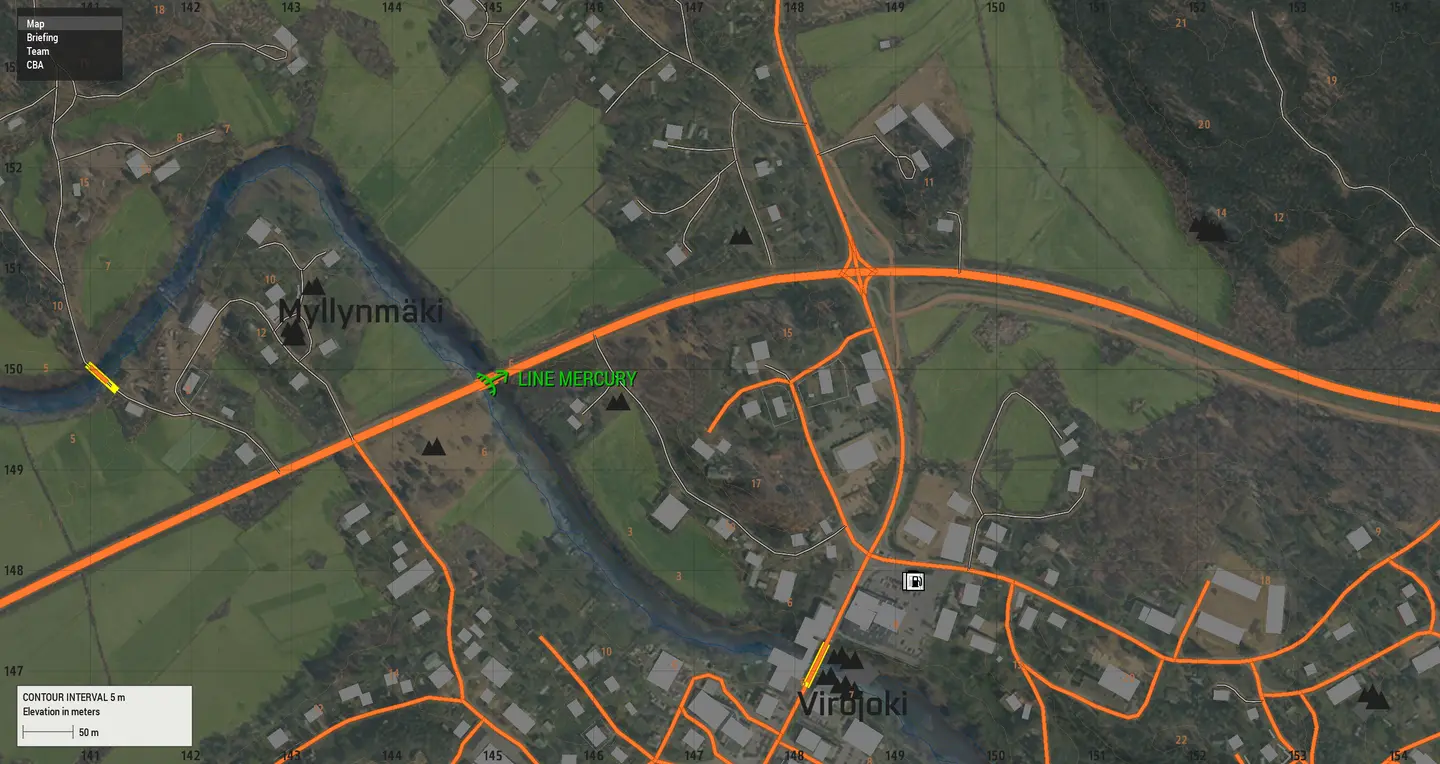
Phase III: Stepoff to LINE MERCURY 1915 CST
- Echo vehicles will transport Alpha to LINE MERCURY
- All elements will dig in and establish hard defenses
- Demo charges are to be placed on the bridge should the line fall
- Essential needs should be ferried from Michelob Airbase to FOB WHITECLAW should the airbase be lost
Reference Warno for Drone ISR
-
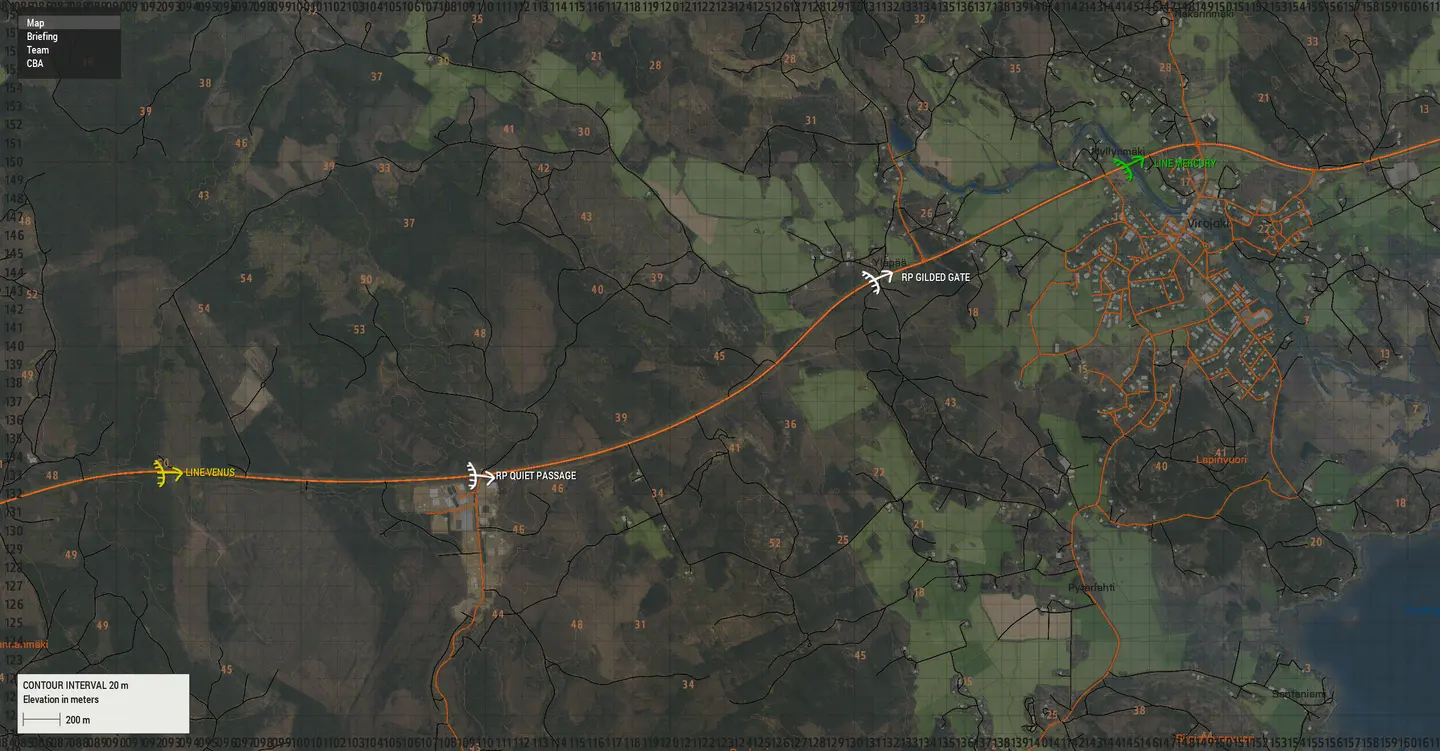
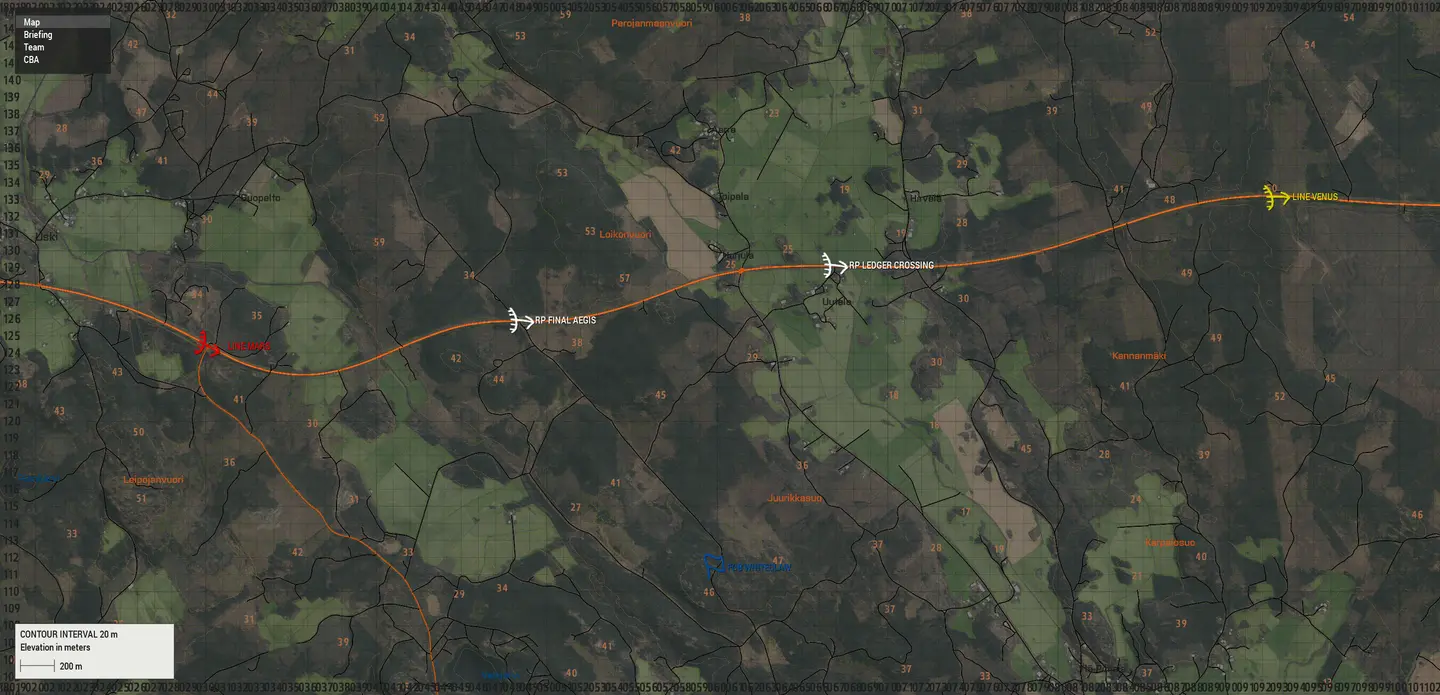
Phase IV: Fallback to LINE VENUS
- Should LINE MERCURY be untenable, forces will bound back to LINE VENUS halting every 2 KM to allow each element to pass through each other while maintaining a fighting withdrawal
- These are not points to dig in rather points to halt and engage at range with harassing and delaying fire
- Bastion -> RP GILDED GATE
- Dragoon -> RP QUIET PASSAGE through Bastion's position
- Bastion -> LINE VENUS and begin digging in
- Dragoon -> Skirmish withdrawal to LINE VENUS
- Should LINE MERCURY be untenable, forces will bound back to LINE VENUS halting every 2 KM to allow each element to pass through each other while maintaining a fighting withdrawal
Reference Warno for Drone ISR
-
Phase V: Fallback to LINE MARS
- If finally LINE VENUS is untenable, forces will bound back to LINE MARS halting every 2 KM to allow each element to pass through each other while maintaining a fighting withdrawal
- Again these are not points to dig in rather points to halt and engage at range with harassing and delaying fire
- Bastion -> RP LEDGER CROSSING
- Dragoon -> RP FINAL AEGIS through Bastion's position
- Bastion -> LINE MARS and begin digging in
- Dragoon -> Skirmish withdrawal to LINE MARS
- If finally LINE VENUS is untenable, forces will bound back to LINE MARS halting every 2 KM to allow each element to pass through each other while maintaining a fighting withdrawal
Reference Warno for Drone ISR
-
Phase VI: EXFIL
- If time permits conduct side mission
- Exfil to most expeditiously available allied base
-
Phase VII: RP/AAR
-
All units prepare for debrief.
-
Imagery:
Timeline (in CST)
Command and Signal
Long Range Frequencies:
- Command 45
- RTO 45, 35
- Alpha Lead 40
- Flight Lead 45, 30
- Pilots 30, 35
- Echo Lead 45,80
- RRC 69
- Convoy 50
Nonverbal Coordination:
- Green: This is used to mark friendly positions on the field.
- Blue: Marking suitable locations for Landing Zones.
- Red: This is used for marking enemy positions for all units to reference.
- Yellow: This is used to inform friendly forces that Immediate medical support is needed.
- Purple: This color represents a friendly position with enemy units danger close, Anyone outside of 100 meters away from the smoke should be assumed hostile.
- Orange: This tells anyone in the air that a friendly unit is in desperate need of resupply.
Call signs for Supports:
- All assets will be provided at base. Any lost assets/wrecks must be recovered to base or they will be permanently lost. Utilize the map tool-tip "FBCB2" options to find and track vehicle numbers.