
Opord
Situation
After the daring paradrop conducted by the 17th into Malden, they were able to capture the airfield and the three major cities of Malden. After the grim battle, Mortuary Affairs from the Army was able to identify the body of Russian Spec Op soldiers meaning that Russia is beginning their move with Malden and Koljugev Forces. However this means that vehicles and supplies are in circulation across all the islands.
Area of Operation (AO):
South Malden
Forces in Play:
Opfor:
- Malden Defense Force
- Koljugev Defense Force
- Russian Federation
Blufor:
- 17th Ranger Battalion "Iceberg's Battalion"
- 2nd Battalion, 7th Marines "War Dogs
Civilian Considerations:
- Civilians have evacuated Maské.
Engagement Criteria:
Open fire on enemies once the ambush has been triggered.
Enemy convoys will move through the towns along their route and drop off supplies, activating garrisoned forces within each town.
Enemy convoys reach their final supply destination and perform an effective counter-attack against the newly acquired 17th airbase.
Mission:
The 17th will leave the North-Eastern Airfield by UH-60M and set up ambushes at OBJ Rump and OBJ Brisket. Once convoys have been dealt with, Alpha will be picked up and moved to begin an assault through OBJ Sirloin from the West.
Execution:
Ambushes will be planned set up by Phantom Lead and Yokai Lead using mines/CSWs/weapons teams/etc.
Objectives:
- OBJ Rump -
Entire enemy convoy and supplies must be destroyed before reaching the town of Dourdan, then clear out any forces which approach from Houdan. Once clear, Yokai will be picked up and moved to assault La Pessagne. - OBJ Brisket -
Entire enemy convoy and supplies must be destroyed before reaching the town of Arudy, Phantom will then clear out any remaining forces from the towns of Cancon and Chapoi. - OBJ Sirloin-
Both platoons will be picked up and taken to LZ Dinner, where they will make a final assult through the towns of Arudy and Dourdan.
CONOP:
-
Phase 0:
-
Phase I: Brief
- Echo will stage UH-60Ms ready to load in both Alpha platoons.
-
Phase II: Prep
- Phantom and Yokai will insert and move rapidly to their ambush locations [OBJ Brisket and OBJ Rump respectively] and get set up with their desired equipment
- Hammer will be inserted by MH-6M an find a suitable location to set up their Mk6 mortars and await calls for support.
- Hades will prepare their MH-60M (DAP) and wait outside the AO until the ambush has begun. They will then move into the AO and provide fire support.
-
Phase III:
- Once the convoys reach the ambush points. Platoons will being their attack.
- OBJ Rump ambush initiation keywords is "Well Done".
- OBJ Brisket ambush initiation keyword is "Steak Sauce".
- All enemy vehicles and supplies must be destroyed before continuing on to the next phase.
- Platoons will fall back to their initial LZs if contact becomes too overwhelming.
- Once the convoys reach the ambush points. Platoons will being their attack.
-
Phase IV:
- Platoons will push through and clear contact in any nearby towns.
- If Yokai has cleared the town of Houdan, they will request transport via UH-60M to La Pessagne and proceed to clear contact there.
- Platoons will push through and clear contact in any nearby towns.
-
Phase V:
- Both platoons will be picked up by UH-60M and taken to LZ Dinner, where they will organize and begin their assault through the towns of Arudy and Dourdan. All enemy contact must be cleared.
-
Phase VI: RP/AAR
-
All units prepare for debrief.
-
Imagery:
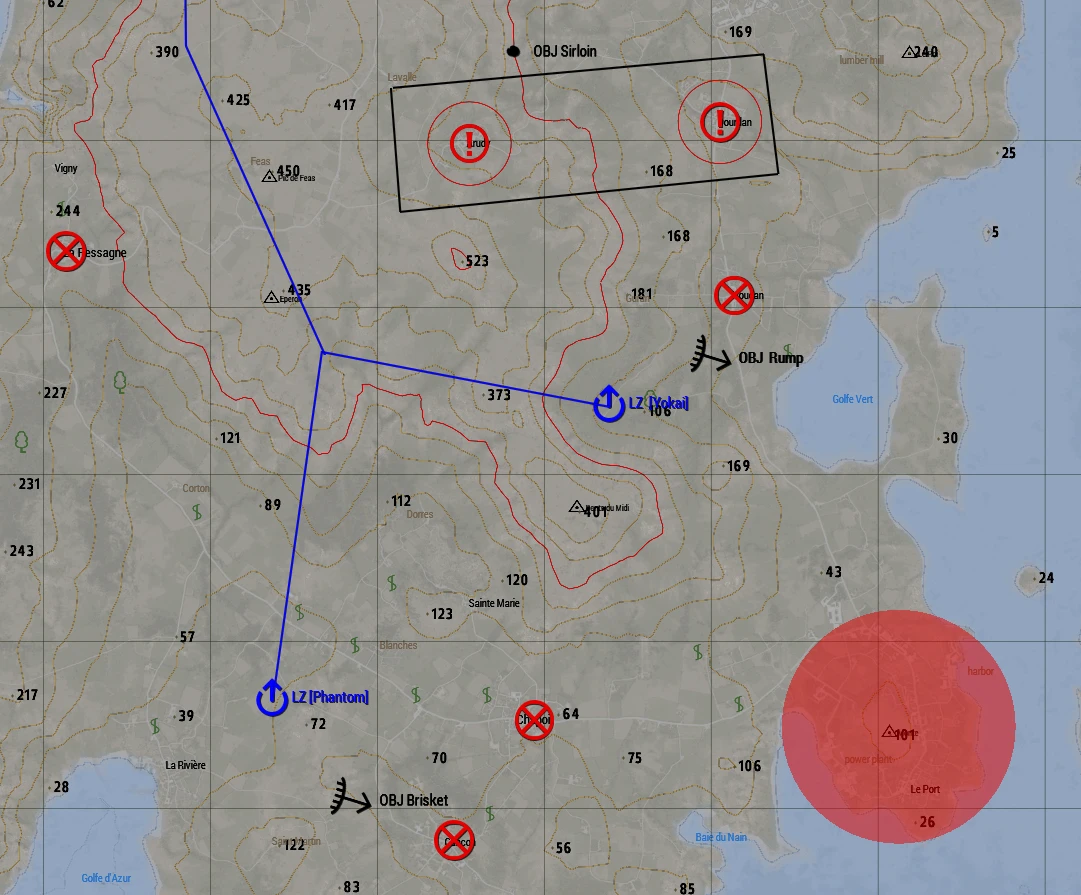
Entire AO
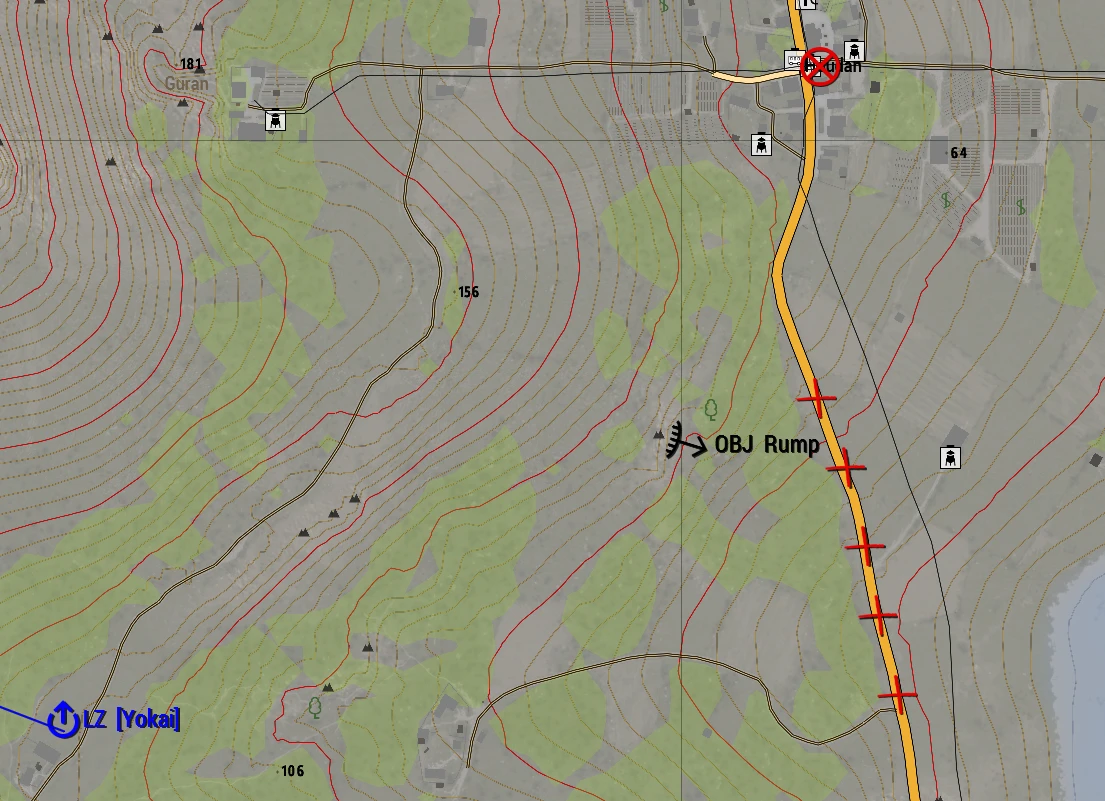
OBJ Rump

OBJ Brisket

OBJ Sirloin
Timeline (in CST)
6:45pm: Organize units, and kit up
7:00pm: Operation Brief
7:15pm: Operation Start
10:30pm: All OBJ cleared, prepare for AAR.
Command and Signal
Long Range Frequencies:
- Command 45
- RTO 45, 35
- Alpha Lead 40
- Flight Lead 45, 30
- Pilots 30, 35
- Echo Lead 45,80
- RRC 69
- Convoy 50
Nonverbal Coordination:
- Green: This is used to mark friendly positions on the field.
- Blue: Marking suitable locations for Landing Zones.
- Red: This is used for marking enemy positions for all units to reference.
- Yellow: This is used to inform friendly forces that Immediate medical support is needed.
- Purple: This color represents a friendly position with enemy units danger close, Anyone outside of 100 meters away from the smoke should be assumed hostile.
- Orange: This tells anyone in the air that a friendly unit is in desperate need of resupply.
Call signs for Supports:
Airframes:
- MH-6M Transport = "Apollo"
- AH-6M Attack = "Artemis"
- OH-6M Scout = "Icarus"
- CH-47F Chinook = "Achilles"
- MH-60M (DAP) = "Hades"
- UH-60M Transport = "Griffin"
- UH-60M Medical = "Dustoff"
- Blackfish (support) = "Pegasus"
- Blackfish (attack) = "Spartan"
- AH-64D Apache = "Orion"
- A-10 Warthog = "Ares"
- A-29 Super Tucano = "Odyssey"
- C-130J Super Hercules = "Hercules"
- F/A-18 E/F = "Xerxes"
- AH-1Z Viper = "Athena"
- UH-1Y Venom = "Homer"
- CH-53E Super Stallion = "Atlas"
Ground
- M1165A1 Humvee = "Dagger"
- M1117 ASV = "Tanto"
- M1132 Stryker = "Katana"
- Badger IFV = "Rapier"
- M2A3 Bradley = "Sabre"
- M1A2 Abrams = "Claymore"
- Rooikat 120 = "Gladius"
- M142 HIMARS = "Halberd"
- M109 Paladin = "Glaive"
- Mk6 Mortar Team = "Hammer"
- 105mm Howitzer = "Mailman"
- MK.V SOC = "Poseidon"
- Speedboat Minigun = "Neptune"
- RHIB = "Trident"
Available Assets:
-
Ground
- 6x SOCOM HMMV (3x of Each Variant)
- 1x Command MRAP
- 1x M1134 (TOW)
-
Naval
- N/A
- N/A
-
Air
- 4x MH-6Ms
- 4x UH-60M
- 2x MH-60M DAPS
- 1x AH-64D
- 1x AH-1Z Viper
- 2x C-130
- 1x A-164 Wipeout (Replaced A-10C II)